

Article owned by team: Information Systems and Support
Microsoft Teams is the ultimate messaging app for your organization—a workspace for real-time collaboration and communication, meetings, file and app sharing, and even the occasional emoji! All in one place, all in the open, all accessible to everyone.
Click here for a video on What is Microsoft Teams
Also: See the Moodle tutorial on how to use Microsoft Teams for teaching online.
- Switch to the new Microsoft Teams
- Learn about recent Teams desktop app updates
- Explore ways to log into Microsoft Teams
- Understand what Microsoft Teams is
- Types of Teams
- Learn about channels in a team
- How to have a conversation and reply to one in your team (Posts)
- Know about settings I can change
- Understand the Activity feed
- Learn how to use @mentions in Teams to get people's attention
- Learn about 'Chat' on Teams
- Learn about Tab's in a channel or chat
- Use Teams meetings:
- Understand meetings
- How to join a meeting
- Share content in Microsoft Teams meetings
- Schedule a meeting in Teams
- Assign categories to a meeting
- Invite people outside your organisation
- Invite people with a link
- Add a meeting co-organiser
- Make it a channel meeting
- Schedule meetings in a channel calendar
- How to add a shared calendar to a channel
- Right-click for more options
- Reschedule a meeting
- Set your Show As status in a Teams meeting
- Start an instant meeting
- Record a meeting
- Find recordings
- Play and share a meeting recording in Teams
- Use meetings for online teaching (This links to Moodle.)
- Use breakout rooms in Teams meetings
- Create breakout rooms before the meeting
- Create breakout rooms during the meeting
- Change breakout room settings before meeting
- Assign people to breakout rooms manually
- Appoint breakout rooms managers
- Rename breakout rooms
- Set a time limit for breakout room sessions
- Start using the breakout rooms
- Attendance reports for breakout rooms
- Additional options for breakout rooms
- Learn about Calls & Devices:
- Learn how to use files in Teams:
- Accessing Teams on a non OP device
KB Update Timeline:
Switch to the new Microsoft Teams
Switch to the new Teams and experience the fastest version of Teams yet, rebuilt from the ground up. With a performance-first mindset, the new Teams is faster, simpler, and more flexible than ever before. In the new Teams, you can switch between apps, respond to chat messages, and join meetings and calls more quickly while using less battery and memory. Launch and navigate in fewer clicks, with the same layout you're used
Start using the new Teams
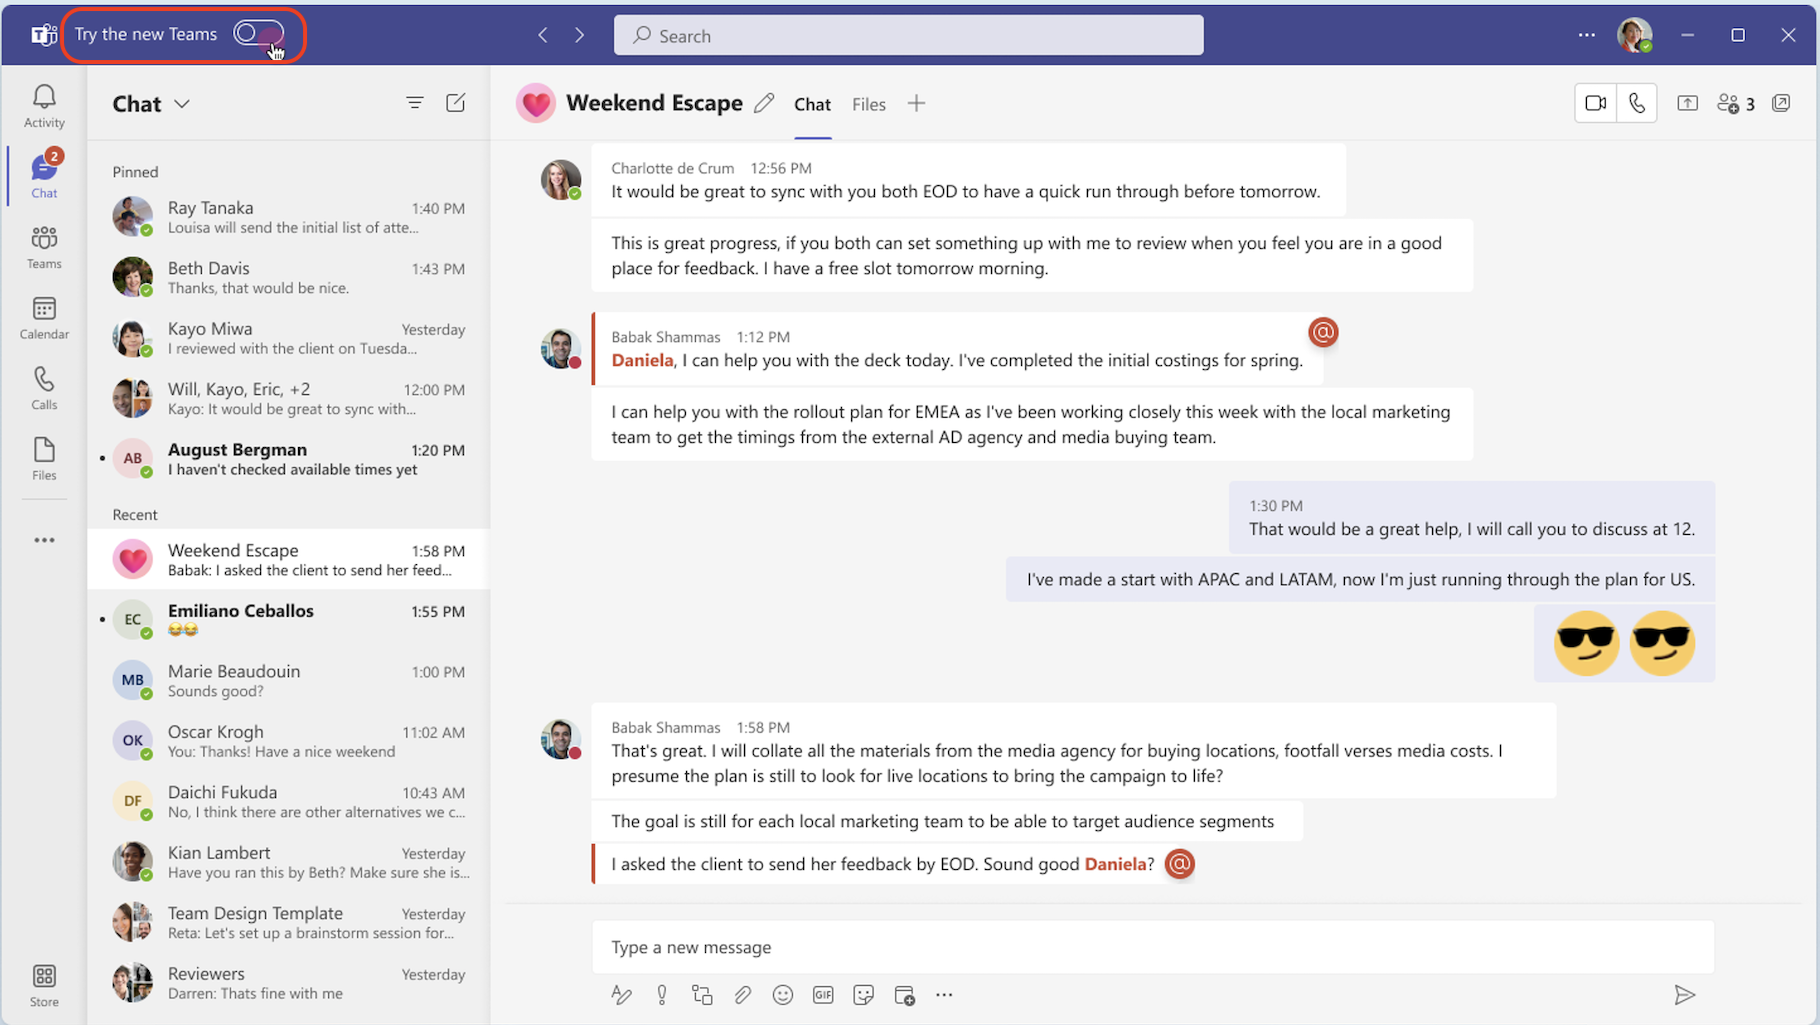
To get started using the new Teams, flip the toggle next to Try the new Teams in the upper-left corner of the classic Teams app.
To use the new Teams:
Open the Teams desktop app on your Windows device.
Turn on the Try the new Teams toggle at the top of Teams.
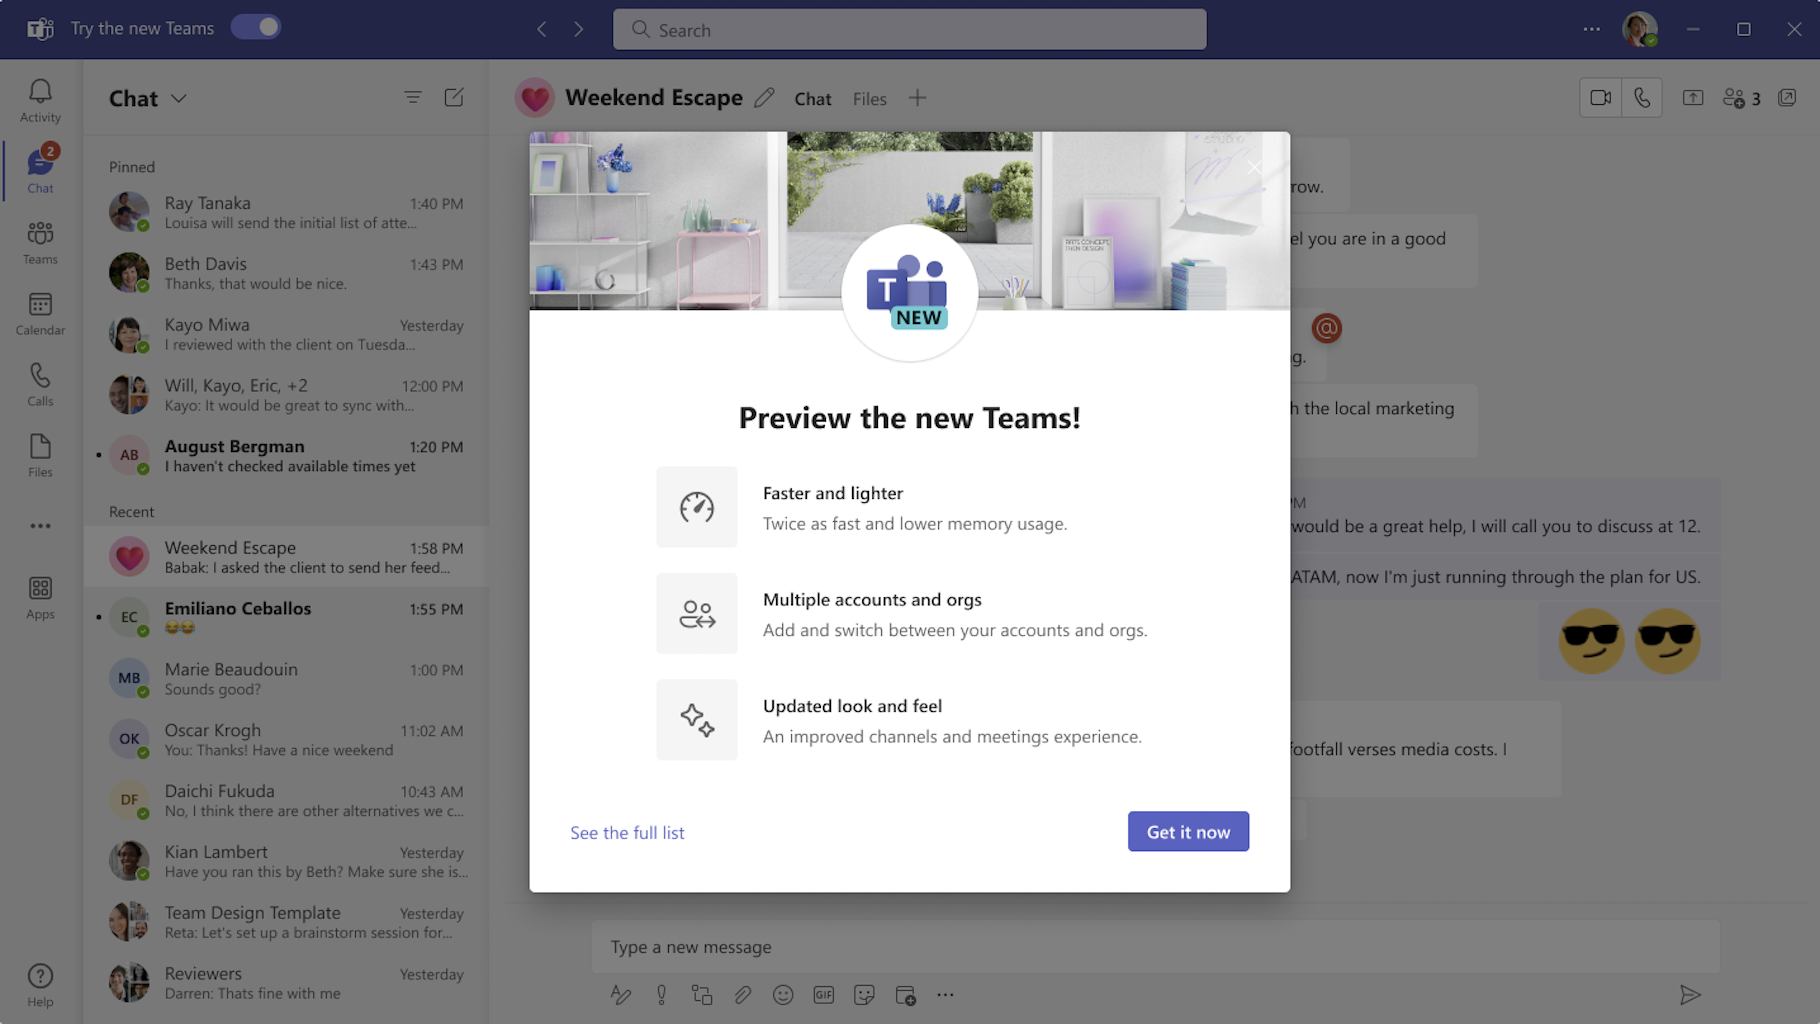
- Select Get it now from the pop-out dialogue. The new Teams will start installing.
Your Teams app will reboot to open the new Teams. Any subsequent actions you take will happen in the new Teams by default, like joining a Teams meeting from Outlook.
When in the new Teams, turn on (or off) notifications by selecting Settings and more  at the top of the new Teams, then selecting Settings > Notifications > Open Windows notifications settings. Find Microsoft Teams (work preview) in the apps list and set your preference.
The new Teams has full feature parity for almost all features including custom line-of-business apps, third-party apps, breakout rooms, 7x7 video, call queues, PSTN calling, contextual search in chats and channels, cross-post a channel conversation, and more.
If you'd like to switch back to classic Teams, it's easy to toggle back and forth. To switch back to the classic Teams, turn off the New Teams toggle at the top of Teams.
Note:
If you are in a meeting or call while turning off the toggle, a notification will ask you to confirm the switch. Your call or meeting will be disconnected.
When you switch between the new and classic Teams, the version you’re currently using will close and the one you’re switching to will automatically open and become your default version.
For updates on features as they become available in the new Teams, see What's new in the new Microsoft Teams.
Help is moving! In the new Teams, you can access authoritative help and support articles, videos, and the latest on what's new by selecting Settings and more next to your profile picture at the top of the new Teams, then select  Help > Get help, Help > Video training, or Help > What's new.
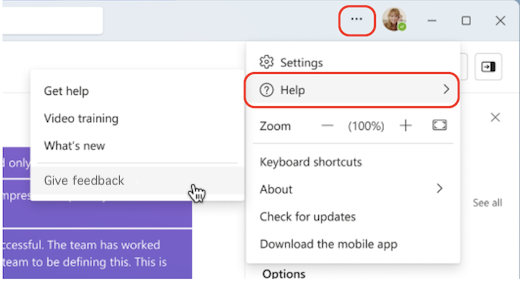
Your feedback is critical for improving the Teams experience. If you encounter a bug or have feedback when using the new Teams, select Help > Give feedback and follow the prompts.
Learn about recent Teams desktop app updates
September 2023
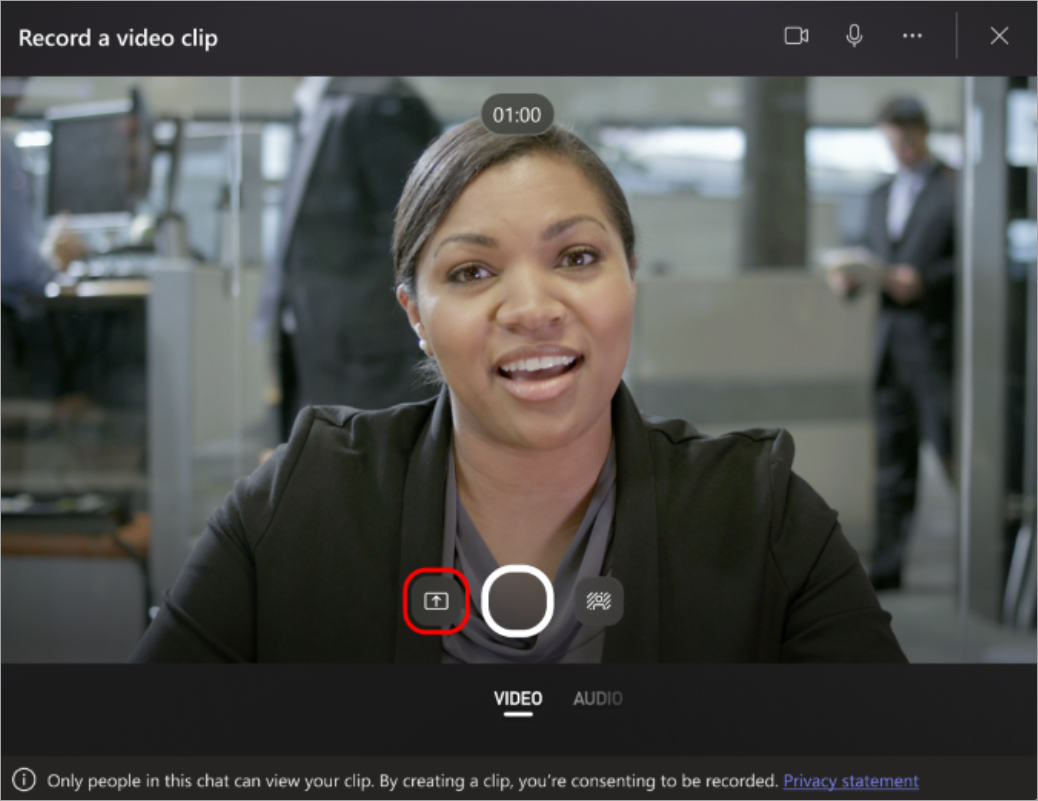
Record video clip messages in a chat
Now you can blur your background, record your screen, and record audio-only clips when you send a video clip message in a chat. To learn more, see Record a video or audio clip in Microsoft Teams.
August 2023
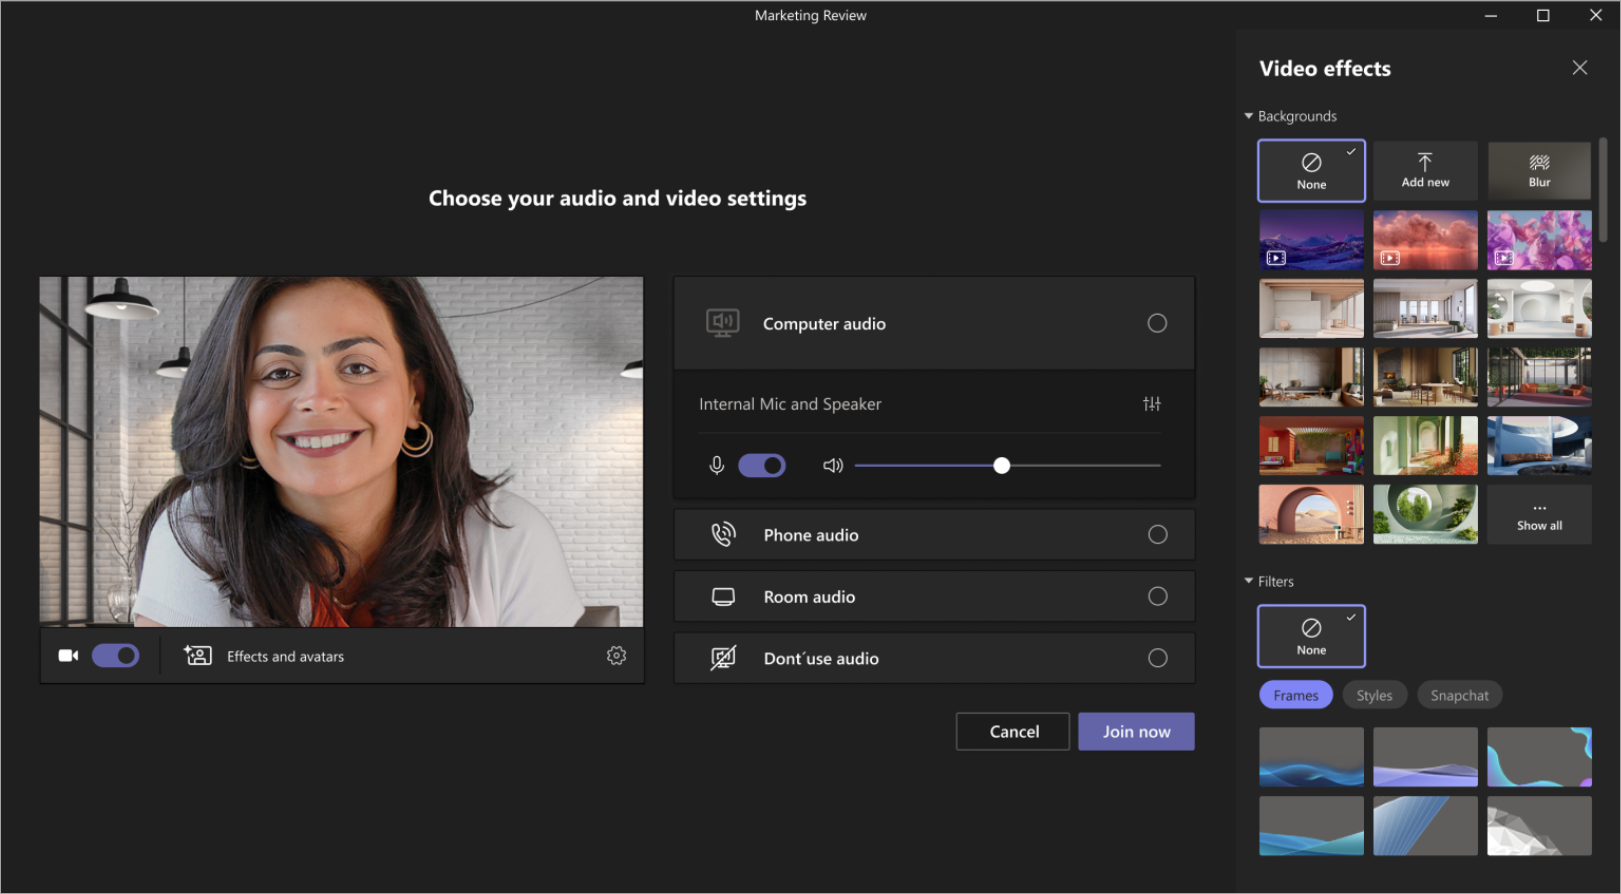
Keep your meeting moving with animated backgrounds
Meet in front of dynamic, animated backgrounds for a more immersive virtual experience during Teams meetings. Before your meeting, select Effects and Avatars > Video effects on the pre-join screen. Then, select a background with a video icon in the corner of the preview picture. To learn more, see Change your background in Microsoft Teams meetings.
Get important chat details at a glance with compact mode
Scan chats quickly with compact mode. In compact mode, message previews are hidden from the chat list, showing more of your conversations. Consecutive messages from the same sender are condensed and separated by line breaks. To use compact chat mode in Teams, select Settings and more > Settings and set Chat density to Compact. To learn more, see Change the spacing of your chat messages in Microsoft Teams.
Edit and reply to specific messages in chat using hover menu
Hover over a message you received in chat and select Reply  to respond to that specific message. Hover over a message you sent and select Edit
  to make changes to the message you sent. To learn more, see Edit or delete a sent message in Microsoft Teams.

July 2023
Zoom in and out of a screenshare during a Teams meeting
Use the zoom buttons at the bottom of your meeting window to zoom in, zoom out, or restore the original view of a screenshare during Teams meetings. To learn more, see Zoom in and out of Microsoft Teams.
Switch it up with participant shuffle in Teams breakout rooms
Randomly assign participants in Teams breakout rooms with participant shuffle. Decide to shuffle everyone or just participants who aren’t assigned to a room yet. To shuffle participants, open the meeting on your Teams calendar and select Assign participants > Shuffle. Choose to shuffle Everyone or Only assigned people. Then, select Save. To learn more, see Use breakout rooms in Microsoft Teams.
Copy and send the link of a group chat message
Need to reference a specific message in a group chat? Right-click the message, then select Copy link to copy that message’s link. Paste it into another message or post to share. When recipients select the link, they’ll go right to that message in the conversation. To learn more, see Share a link to a specific message.

Enhanced video experience in Teams chat.
Play shared Microsoft Stream videos, like meeting recordings, and see their captions directly in chat.
Drag and drop meetings into new timeslots
Easily reschedule an event in your Teams calendar by selecting the event, dragging it into a new timeslot, and dropping it. You can also check other participants’ availability before you update the event. To learn more, see Schedule a meeting in Microsoft Teams.
June 2023
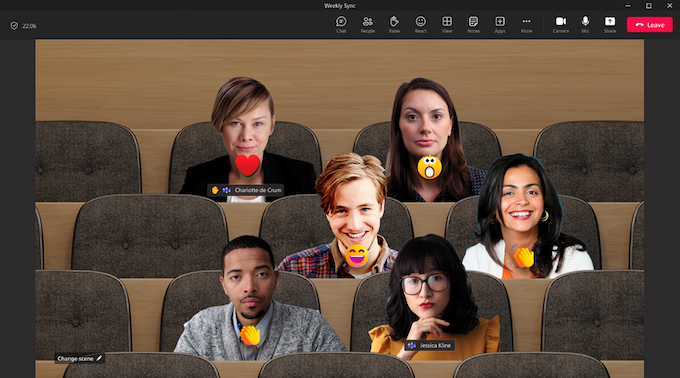
Together mode improvements
Usability improvements in Together mode let you see each person’s name, reactions, or raised hand by their videos. Status icons show if someone’s muted, speaking, pinned, or spotlighted. To see your meeting in Together mode, select View > Together Mode.
Change your view of meeting captions
Customize font size, color, positioning, and how many lines are displayed in captions during meetings. To edit caption settings in your meeting, go to More ...> Language and speech > Turn on live captions. Then, select Settings > Captions settings. To learn more, see Use live captions in a Teams meeting.
Mark all as read
All caught up? Mark all notifications in your Teams activity feed as read by opening your activity feed and selecting More options > Mark all as read. To learn more, see Manage notifications in Microsoft Teams.
See more, scroll less in chat
View up to 50% more of your Teams chat list at once with compact chat. Compact chat hides message previews and only shows names of groups or individuals you’re chatting with. To try compact chat in Teams, go to Settings and more> Settings and select Compact under Chat density. To learn more, see Change the spacing of your chat messages in Microsoft Teams.

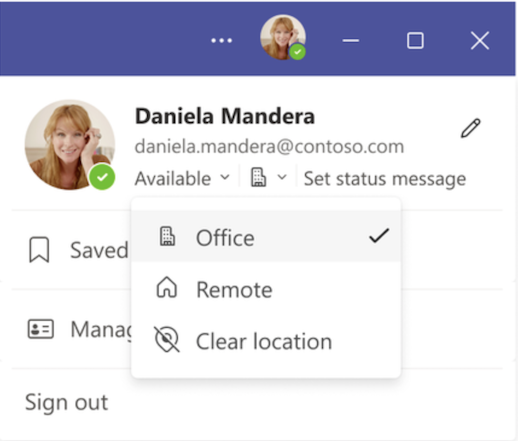
Set your work location for the day
Whether you decide on an impromptu afternoon at the office, or to wrap up your project at home, Teams work location settings are as flexible as you are. Switch your work location in Teams by selecting your Teams profile picture and choosing your location from the location dropdown menu. To learn more, see Set your work location in Microsoft Teams.
Explore ways to log into Microsoft Teams
Our organisation's PC's and laptops are setup to automatically log into the desktop version of Microsoft Teams. If this doesn't automatically happen for you, you can start Teams by doing one of the following:
In Windows, click Start
 > Microsoft Teams. You can also type Teams into the search tab beside the button.
On Mac, go to the Applications folder and click Microsoft Teams.
On the web, go to https://teams.microsoft.com. Sign in with your Microsoft 365 username and password.
- When using the Teams Mobile app, tap the Teams icon, then sign in with your Microsoft 365 username and password.
- You can also go to Tūhono, our staff intranet web page, and click on the Microsoft Teams link as shown below. This will take you to the web version of Microsoft Teams and it will log into your Teams account.
Understand what Microsoft Teams is
Click here for a video on What is Microsoft Teams
Microsoft Teams is a collaboration app built for hybrid work so you and your team stay informed, organized, and connected — all in one place.
Explore how Teams can help you and your colleagues come together no matter where you are:
Chat - Message someone or a group to talk about work, projects, or just for fun.
Teams - Create a team and channels to gather people together and work in focused spaces with conversations and files.
Calendar - Connect with people before, during, and after a meeting so prep and follow-up are easy to find. This Teams calendar syncs with your Outlook one.
Apps - Find familiar apps and explore new ones to simplify, customize, and manage how you work.
A team is a group of people gathered to get something big done in your organization. Sometimes it’s your whole organization.
Teams are made up of channels, which are the conversations you have with your teammates. Each channel is dedicated to a specific topic, department, or project.

Roles
Every member in Teams has a role, and each one has different permissions.
- Team owners manage certain settings for the team. They add and remove members, add guests, change team settings, and handle administrative tasks. There can be multiple owners in a team. For official OP Teams, ISS are the only owners.
- Members are the people in the team. They talk with other team members in conversations. They can view and usually upload and change files. They also do the usual sorts of collaboration that the team owners have permitted.
Guests are people from outside of your organization that a team owner invites, such as partners or consultants to join the team. Guests have fewer capabilities than team members or team owners, but there's still a lot they can do.
Types of Teams
When you create a new team in Microsoft Teams, you’ll be asked to select from one of four options. You should choose Staff.
About the 'staff' team type:
- OP staff can collaborate on administration, service delivery and development.
- Your official teams created by ISS fall in this category. ISS created teams are owned by ISS.
- Owners control posting settings.
- Staff members may only have write permission in certain areas.
For information other types of teams and about what features are accessible see Microsoft Support.
Learn about channels in a Team
Teams are made up of channels, which are the conversations you have with your teammates. Channels sit inside of teams, similar to how files sit inside folders. Each channel is dedicated to a specific topic, department, or project.
For example, the Mark 8 Project team has General, Design, Digital Assets Web, Go to Market Plan, and Research and Development channels. All the conversations, meetings, files, and apps in the Design channel have to do with design, and everything in this channel is visible to everyone on the Mark 8 Project team.
While channel conversations are public, chats are just between you and someone else (or a group of people). Think of them like instant messages in Facebook Messenger or other messaging apps.
To create a standard channel, start in the team list.
Find the team name and click More options (...)
Then select Add channel
By default, all members of a team can access the channels. Find out more about using Teams and Channels from Microsoft Support.
Show, hide, or pin a team or channel in Microsoft Teams
Note:
The following is based on your Teams view being in the 'List' format. [see Changing your Teams viewing options]
There are three viewing options for teams and channels: show, hide, and pin. Channel posts can also be pinned.
Show a team or channel
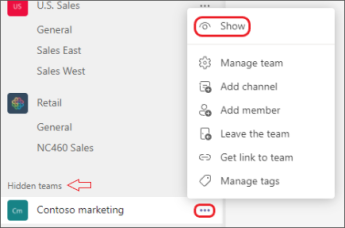
When you join a new team, it's automatically shown in your teams list. If you're a member of a team but you don't see it, do the following:
On the left side of Teams, scroll to the bottom of your teams list, and select Hidden teams.
Locate the team you're looking for.
Select More options
 > Show.
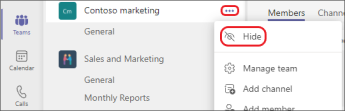
Hide a team or channel
If you don't want a team or channel to show in your teams list, hide it. This is a great way to clean up your list and focus on the teams and channels you're active in.
Go to a team or channel name and select More options > Hide.
You can also show channels from the hidden channels menu beneath the channels list of a team. Select More options > Show.
Note:
To help get you up and running, Teams automatically shows the five most popular channels in every new team you join.
Pin or unpin a channel
Pinned channels stay at the top of the list so you don’t have to hunt them down.
To pin a channel, go to a channel name and select More options > Pin. This ensures that the channel stays at the top of your list. If you change your mind, just select it again and unpin it.
Tip:
Once you pin a channel, drag it into the order you want. If you do this for several channels, you'll have all your pinned channels conveniently placed.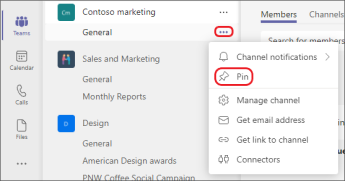
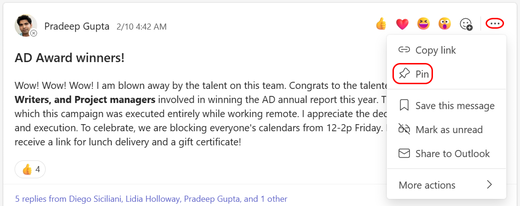
Pin or unpin a channel post
Go to the channel post you want to pin and select More options > Pin. When the Pin this message? popup appears, select Pin again to pin the post. It will now appear in the channel's Channel details pane. You can unpin a post the same way.

How to have a conversation and reply to one in your Team (Posts)
Post a conversation and reply to one in your Team
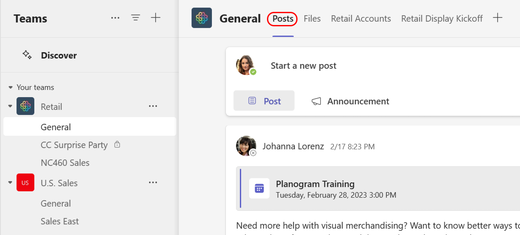
When you go to any channel in Teams, the first tab you'll see is Posts. Think of Posts as one big group conversation.
Everyone who has access to the channel can see the messages on the Posts tab.
Another key thing to know about messages in a channel is that replies to a channel message stay attached to the original message. This way, the whole thread of the conversation can be easily followed by anyone reading it. This is what's great about reading threaded conversations.
To reply to a channel message, select the little Reply link underneath the message.
To post a new conversation in the channel, select the New conversation button at the lower left on the Posts tab.
Replying to an existing message thread or starting a new conversation opens a compose box for you to type and format your message. Either option sends a message to everyone in a particular channel (the entire team).

Handy Tip:
To prevent accidentally sending your message, and to format your message with a suite of editing tools, select Format 
This will open an expanded view where you compose and format your message
When you're done composing your message, select Send  . Your message is now live in the channel.
Note:
If you only want to talk to one person or a small group, see Start a chat in Teams.
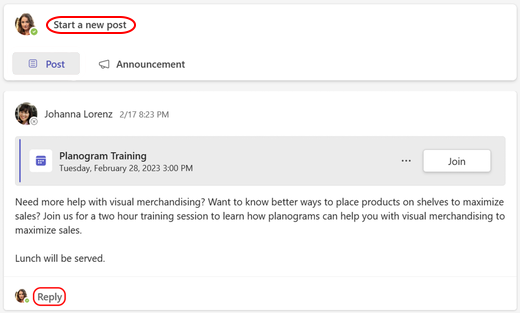
Post an announcement and reply to one in your Team
Sometimes your message needs to stand out. With options for a headline and image, channel announcements help your message cut through noise.
How to create an announcement
In the channel select New conversion, select Format
under the box where you type your message.- At the top of box that appears, select the arrow next to New conversation > select Announcement.
Type a headline, change its background color, or add a background image for the headline area—lots of options!
Type the topic of your announcement in the Add a subhead area, then add the body of your message, and select Send
 .
.
Note:
Announcement messages are available only in channels—not in group or 1:1 chats.
Know about settings I can change
Change my availability status
If you want to make sure people know when you’re busy or away from your desk, set your status in Teams. The little dot on your profile indicates if you’re available or not.
Teams will automatically set the status in some cases based on your calendar bookings and when you’re in a call. However to explicitly set it yourself you can do the following:
Navigate to your status settings by selecting your profile picture in the top right-hand corner of Teams.
Click on the current status as shown in the drop-down box below, then select the status you want to set.
You can also update your status from the command box. Type /available, /busy, /dnd, /brb, /away, or /offline to set your status as Available, Busy, Do not disturb, Be right back, Away, or Offline.
Here’s more detail about each kind of status that you change:
Available is when you’re active in Teams and don’t have anything in your calendar (no meetings or calls, for example). Note that Teams will automatically set your status from Available to Away when you lock your computer or when it enters idle or sleep mode. On mobile, this will happen when the Teams app is in the background.
Busy is when you want to focus on something, and you do want notifications to pop up. If you’re in a meeting or call, Teams will automatically change your status to In a meeting or In a call (Busy) when not set to Do not disturb.
Do not disturb is when you want to focus or present your screen and don’t want notifications to pop up.
Be right back is when you want to say you’re temporarily away. It’s never set automatically.
Appear away is when you need to work without responding right away.
Appear offline is when you want to indicate that you're not signed in to Teams, so will not be responding until you're back online. You'll still receive notifications if anyone messages you.
Note:
If you're a MyAnalytics customer, use the MyAnalytics Outlook add-in to book focus time in your calendar. When you're in your focus time, your Teams status will change to Focusing and all notifications will be silenced until your focus time ends.
^ Go to top
You can set a status message in Teams to let others know what you're up to! Whether you're out of office or simply want to share a message for your contacts to see, status messages are a great way to communicate.
Note:
If you have a status message set in Teams, it will not show your automatic out-of-office reply from Microsoft Outlook.
To set your status message in Teams for desktop:
Select your profile picture at the top of your Teams window.
Select Set status message to view options.
- Type the message that you want others to see. If you want people to see your status when they message or @mention you, select Show when people message me.
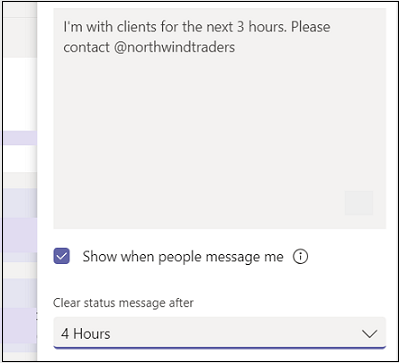
Choose how long you want the message to display before clearing by choosing a duration from the Clear status message after dropdown.
Select Done.
To set your work location for the day in Teams:
Select your profile picture at the top right of Teams.
Next to your status, choose your work location from the location dropdown menu. Your changes will be applied to your work hours for the remainder of the day and will be reflected in both Teams and Outlook.
Update your work location
When your schedule changes, it's easy to update your work location or clear it, right from Teams.
Select your profile picture and change or clear your work location. The new location will be applied to your work hours for the remainder of the day and reflected in both Teams and Outlook.
Related topic
Learn more about work hours in Outlook
Schedule out of office
You can set up an out of office status and message to let your teammates know you're not working or on leave. When teammates send you a chat message, they'll see your out of office reply and know you're unavailable. Your out of office status will also sync with automatic replies in your Outlook calendar.
There are two ways to schedule your out of office status and message in Teams.
Option 1: Schedule an out of office from your profile picture
Go to your profile picture at the top of Teams and select Set status message.
- Select Schedule out of office at the bottom of the options.
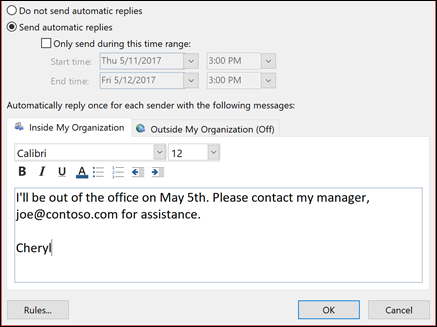
From the screen that appears, turn on the toggle next to Turn on automatic replies.
Type an out of office message in the text box. This message will appear when people contact you in Teams or open your profile. It'll also be sent as an automatic reply in Outlook.
Note:
An out of office message is required in order to set your status and sync with your Outlook calendar.
If you'd like to send an automatic message to people outside of your organization, select the check box next to Send replies outside my organization and choose between your contacts or all external senders. You can tailor your out of office message to this audience, or use the same message you typed above by copying/pasting it into the text box.
Based on when you'll be out of the office, pick the dates and times that your out of office message and status will start and stop displaying by selecting the check box next to Send replies only during a time period.
- Select the Save button.
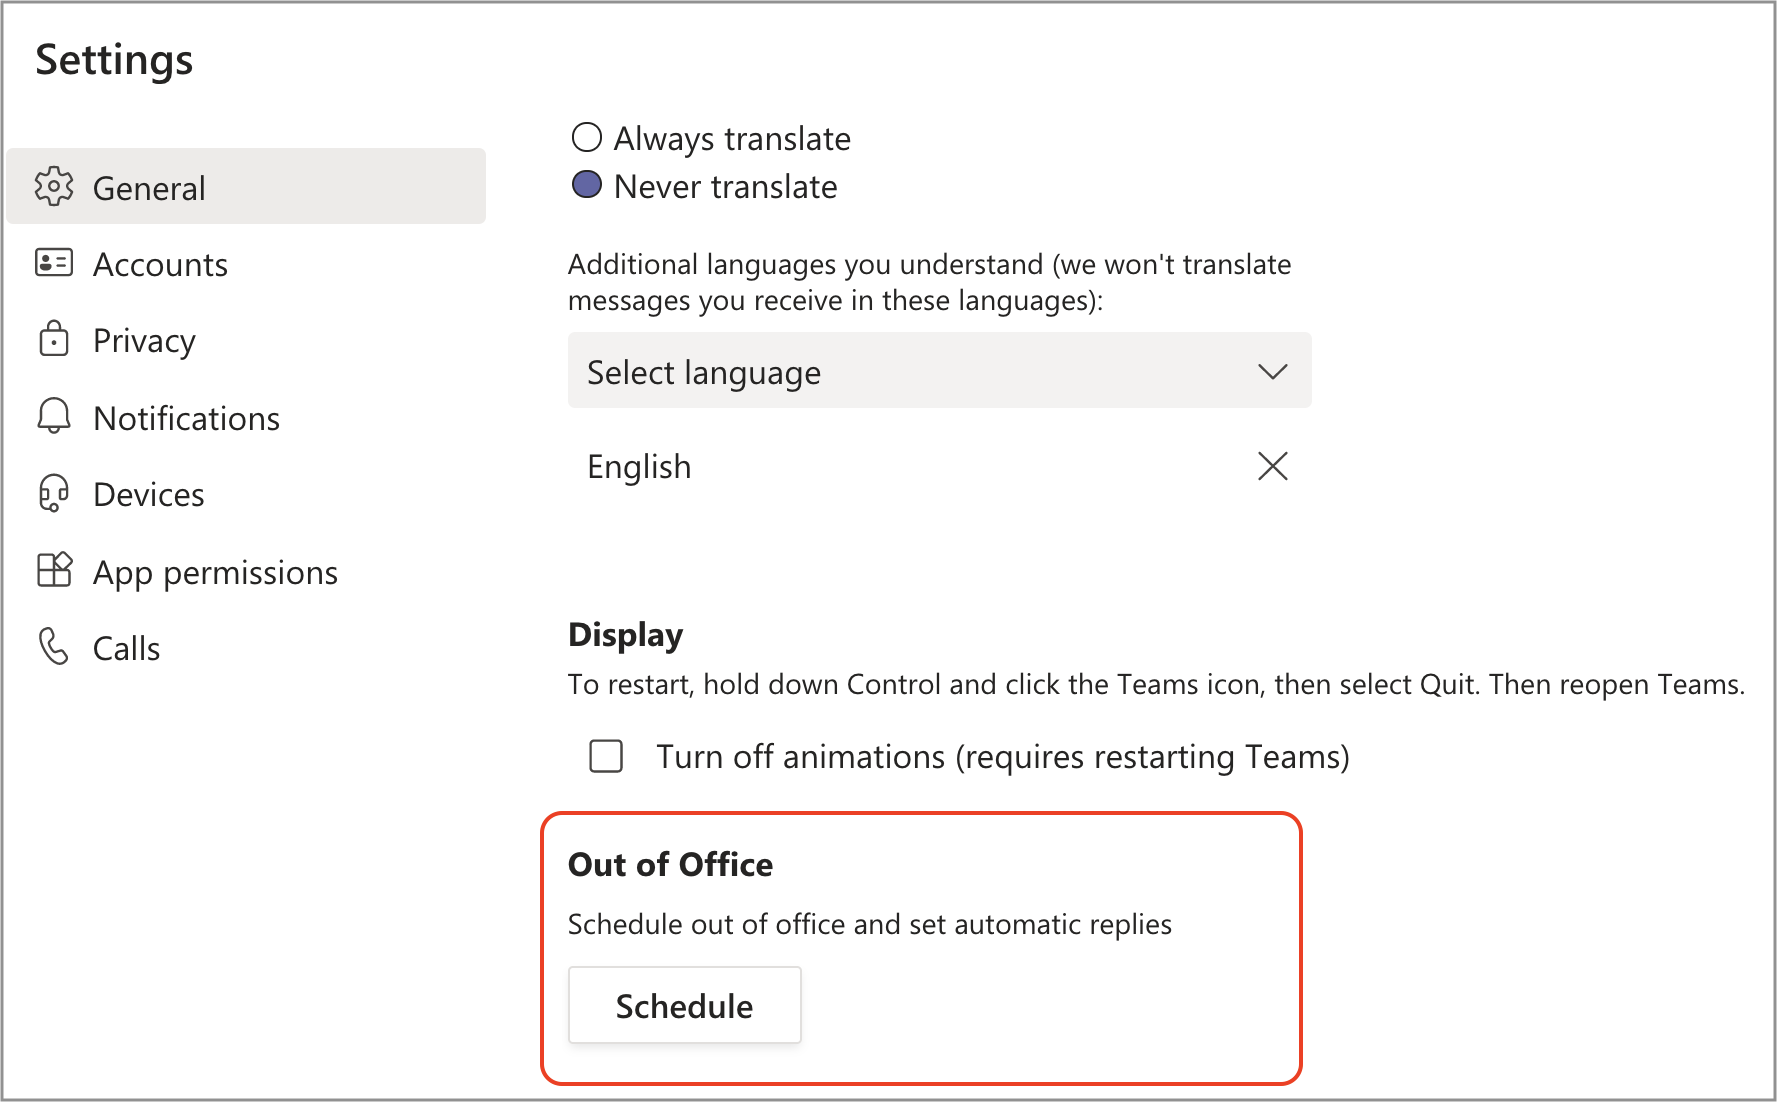
Option 2: Schedule an out of office in Settings
Go to your profile picture in the top right of Teams. Next, select
 Settings > General and locate the Out of Office section.
Select the Schedule button to open the out of office screen. Then follow the same steps as above in Option 1 to set your preferences.
To clear your out of office status and turn off your automatic reply in Teams, select your profile picture and go back to the Out of Office screen either from
Settings > General > Out of Office or by selecting Set status message > Schedule out of office from your profile picture. Turn off the toggle next to Turn on automatic replies and select the Save button. Once you've scheduled an out of office status and message in Teams, you'll see automatic replies turned on in Outlook with the time range and message you set in Teams. If you choose to update your out of office details in Outlook, your changes will be reflected in Teams. To learn how to turn on or off an Outlook out of office reply, see Send automatic out of office replies from Outlook.
Changing your Teams viewing options
In the General settings tab you can choose to alter the: screen Theme, Chat density and Teams home page Layout
Microsoft Teams offers different ways to access, receive, and manage notifications. These settings include how, when, and where your notifications appear, custom settings for channels and chat, appearance and sounds, turning off specific messages, and so on.
Important:
Microsoft Windows can block notifications before they appear in Teams. Follow the instructions in Change notification and action settings in Windows 10 to make sure that your system settings allow apps (including Teams) to send notifications to you.
If you're using macOS version 10.15 and above, follow the instructions at Use notifications on your Mac.
To manage your notifications, select Settings and more in the top right of Teams, then select Settings > Notifications. You then have the following options:
Manage notification sounds
To turn off or turn on notification sounds, toggle on Play sound for incoming calls and notifications.
Customise channel notifications
To be notified about all your shown channels, select All activity
To be notified only when you are @mentioned or when you receive replies to your messages in channels, select Mentions & replies
For the most control over your channel notifications, select Custom
To learn more, see Customize channel notifications.
Change channel notifications from the teams list
Hover on a channel in your teams list and select More options  > Channel notifications
  .
.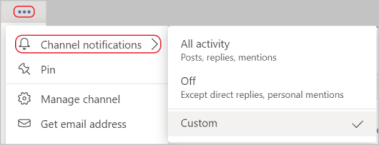
Choose from All activity, Off, or Custom—just as you would in settings. When you select Custom, a new window will open that has more options.
Note:
By default, channel @mentions are turned off and all new posts will only show in Activity .
Customise all other notifications
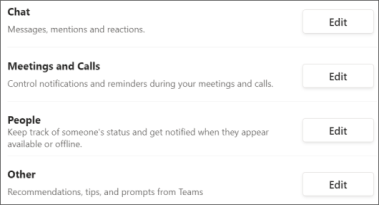
|
Only get notifications in the app
|
Get notified in the app and on desktop
Choose whether or not a message preview shows on desktop by turning the toggle on for Show message preview. Select Banner and feed to receive notifications as both a desktop notification and as an alert in Activity
|
Turn off notifications during meetings and calls
Select Edit next to Meetings and Calls and then turn the toggle on for Mute notifications during meetings and calls.
|
Turn off notifications for specific conversations

In a channel conversation, go to the top right corner of the original message and select More options As with muting a chat, turning off notifications to a channel conversation will stop updates for that specific conversation.
|
Manage notifications from Activity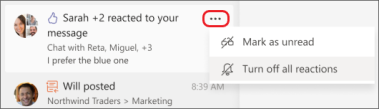
Go to Activity Related topics Best practices for Teams notifications First things to know about notifications Mute notifications during a meeting in Teams Customize channel notifications in Teams
|
Change the 'File open' preference
The standard default setting is that Word, PowerPoint and Excel files will open inside the Teams view. You have the ability to change this so that files either open directly into the Desktop app or in a Browser.
To change the default setting select Settings in the top right of Teams, then select Settings > Files and links > File open preference
From the dropdown options, select the default app you want to open Office files in.
^ Go to top
Activity feed basics
Select Activity to view your Activity feed, a summary of everything that's happened in the channels that are in your teams list. Select Filter at the top right corner of the feed to show specific types of messages such as unread messages, @mentions, replies, and likes. You can select the Unread Only toggle to limit your view to unread notifications.
When a red circle appears next to Activity , you have a notification—such as an @mention or a reply—in your feed. These notifications remain in your feed for 30 days. After that they expire and no longer show in your feed.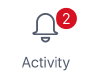
You will also see a red dot beside a channel or chat that has a notification.
^ Go to top
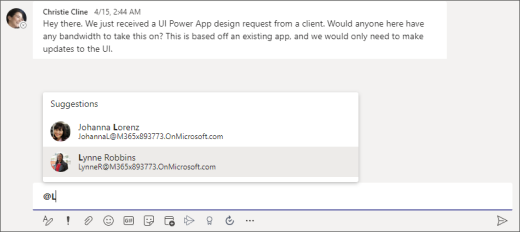
Learn how to use @mentions to get people's attention in Teams
To get someone's attention in a channel conversation or a chat, @mention them. Just type @ before their name and then select them from the menu that appears.
Note:
You can also mention someone simply by typing their name. Start by capitalizing the first letter: as you continue to type the name, a list of people will appear for you to choose from.
When @mentions are used, the recipient/s are guaranteed to receive a notification regardless of whether they have turned off their notifications in settings. By clicking on the notification in the Activity box, they will be taken directly to the point in the conversation where they were @mentioned.
To get the attention of an entire group, try one of the following:
Post something in the team's general channel. The channel name appears bold for every team member.
Type:
@general to notify everyone in the general channel
@<team name> to notify everyone on that team, for example @OP Comms.
- @<channel name> to notify everyone in that channel
If you're in a chat rather than a channel, you can notify everyone in the chat by typing @everyone in your message.
Important:
A team owner must first enable these features.
Chats can be one-on-one or in a group
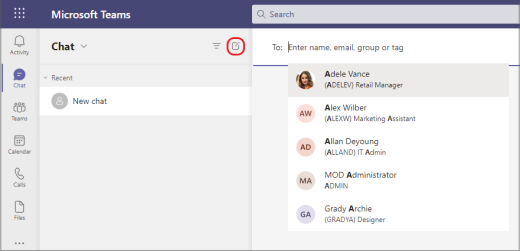
Sometimes, you’ll want to talk one-on-one with someone. Other times, you’ll want to have a small group chat. In Chat, you can do either.
You start one-on-one and group chats the same way: by selecting New chat  at the top of your chat list. Once in a chat, you’ll be able to send messages that include files, links, emoji, stickers, and GIFs—whatever you need to get your point across.
The following are more details about each kind of chat:
One-on-one chat
Once you’ve selected New chat  and entered the person’s name, compose your message in the text box and then select Send
  or press Enter. This starts the chat.

Chat with yourself
For times when you want to draft messages, send files from one device to another, or get to know features a little better, you can start a chat with yourself. Everything you do in a regular chat you can also do in a chat with yourself. You’ll see it pinned to the top of your chat list by default.
If you unpin the chat with yourself and want to find it again, select New chat and enter your name into the To field.

Use a group chat when you need to talk to a small group of people. Start one the same way you start a one-on-one chat: select New chat  at the top of your chat list. Select the down arrow to the far right of the To field and type a name for the chat in the Group name field. Next, type the names of the people you’d like to add in the To field.
Once the chat has begun (whether group or one-on-one), just choose it in the chat list to resume the conversation and send more messages.

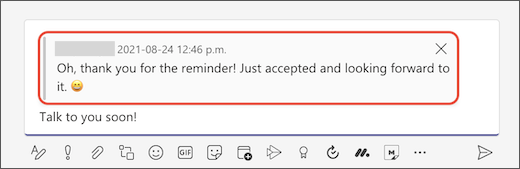
Reply to a specific message in chat
It’s easy to reply to a specific message in your chat. This way, people will have helpful context when they read your reply. In chats, there can be many replies back and forth. When you reply to a specific message, you add clarity to your one-on-one, group, and meeting chats.
On the left side of Teams, select Chat
 to open the chat list.
Find the chat you want, and then go to the message you want to reply to.
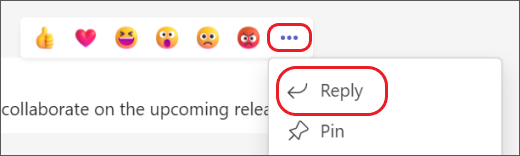
Hover over the message, and choose More options
> Reply.
- The message you selected will appear in the compose box. Type your reply in the compose box, and select Send
 .
.
Reply to multiple messages at once
Hover over a message, and choose More options
> Reply.
- Repeat step one for each message you want to reply to.
The messages you selected will appear in the compose box. Type your reply in the compose box, and select Send
.
How to find the original message
When you see a reply to a specific message in Chat, it’s simple to find the original message. Select the message preview in the compose box by clicking on it, and Teams will scroll up to the location of that particular message and briefly highlight the original message.
Note:
If the original message is more than 30 days old, you’ll need to scroll through your chat history to find it.
Press Shift+Enter to start a new line
If you keep pressing Enter to start a new line, which sends the message before you’re ready, try the following:
When you want to start a new paragraph, press Shift+Enter to insert the line break. If you’ve opened your formatting options (see step 3 for details), just press Enter to start a new line of text, then select Send to send it.

Select Format to see all your formatting options
There are many formatting options for messages.
To open your formatting options, select Format  beneath the box where you type your message. In this expanded view, select the text that you want to format, then choose an option like B, I, or U to bold, italicize, or underline the text. There are also options for highlighting, font size, font color, lists, and more.

Beneath the box you'll also find delivery options, attach files, emoji, giphy, stickers, schedule a meeting, and more. Select More options  to find more apps.
^ Go to top
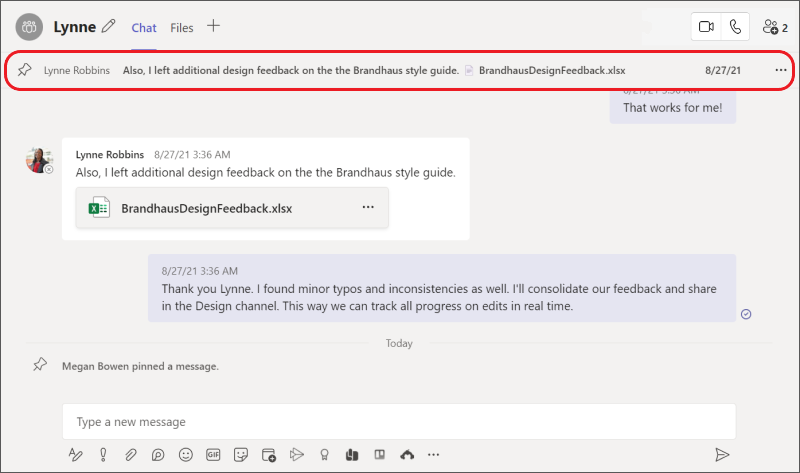
Pin a chat message to the top of a chat
Sometimes you might want to pin a particular chat message for reference in a one-to-one or a group chat. A pinned message appears at the top of the chat and remains there until removed or replaced.
Things to know about pinned chat messages:
When someone pins a message in a chat, everyone in that chat can see it.
Only one message can be pinned at a time.
A pinned message doesn’t affect an ongoing chat.
Anyone in a chat, except guests, can unpin any pinned message or replace it with a different message.
- If someone selects a pinned message, they'll go to the original message in the chat.
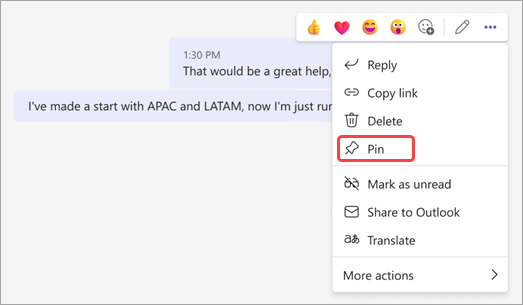
Pin a chat message
In a chat conversation, hover over the specific message that you want to pin.
- In the menu that appears above the message, select More options .

- In the More options menu, choose Pin
 . The pinned message appears at the top of the chat. It also includes the name of the author and the date or time it was originally posted.
Note:
A pinned chat message may be any length. However, only a single line of text that fits within the width of the chat window will be visible.
Example showing - Pinned chat message at the top of a chat
Unpin a pinned chat message
Go to the pinned message at top of the chat.
Select More options
> Unpin  .
.
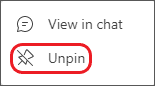
In the confirmation, select OK.

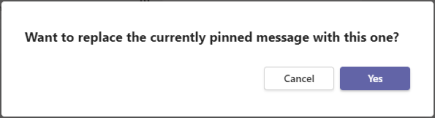
Replace a pinned chat message
To replace a pinned chat message with a new one, just pin a new message. You’ll get a confirmation asking if you want to replace the original pinned message.
Related topics
Show, hide, or pin a team or channel in Teams
Chat happens in channels, too
When you go to any channel in Teams the very first tab is Posts. Think of this as one big group chat. Everyone who has access to the channel can see messages in Posts.
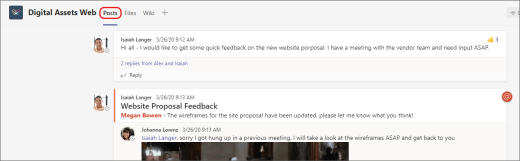
Based on your organization and culture, you'll need to decide which messages are suitable for the Posts tab in a particular channel.
Another important thing to know is that replies to a channel message stay attached to the original message. This way, the whole thread of the conversation can be easily followed by anyone reading it. This is what's great about threaded conversations.
To reply to a channel message, be sure to use the Reply link underneath the message.

Find a chat based on a person’s name
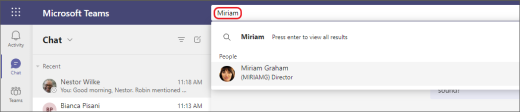
Enter the person’s name in the command box at the top of Teams. You’ll see their name and any group chats they're a part of with you listed. Select their name to go to your one-on-one chat with them or select a group chat to resume that one.
Find a message that has a keyword that you remember
Start typing a keyword into the command box at the top of Teams and press Enter. You’ll see a list of results that include the keyword.
Filter to show certain types of messages
From the Activity feed, select Filter  and then More options to show certain types of messages including unread messages, @mentions, replies, and reactions.
For a more specific search, go to the Feed menu, select the drop-down arrow, and then choose My Activity.

How to save and find your saved messages
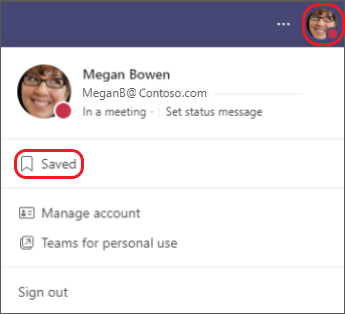
To save a message, hover over it, select More options , and then select Save message  .
.

To see a list of your saved messages, select your profile picture at the top of Teams, then choose Saved. Or, type /saved in the command box at the top of Teams.
Hide or mute chats to keep them out of your way
You can hide the chat from the chat list, or mute it so you stop getting notifications.
Hide a chat
Select Chat
 to open the chat list.
Next to the conversation you want to hide, select More options
 > Hide.
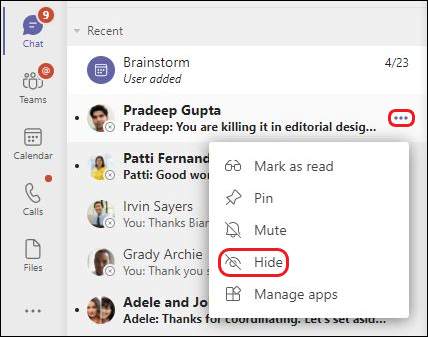
The chat and chat history will be hidden until someone posts a new message to it, and you can always resume an old conversation that you've hidden as well.
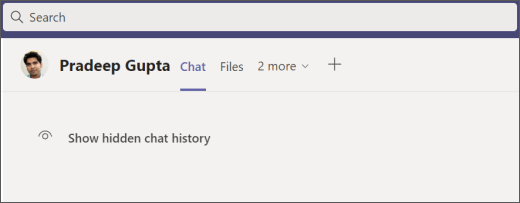
Unhide a chat
Need to see a hidden chat again? Unhide a chat that you've hidden before by using search.
In the Command box
 at the top of Teams, search for the name of the person you were chatting with and select them. You'll see that the chat history is hidden (which you can choose to show by selecting it).
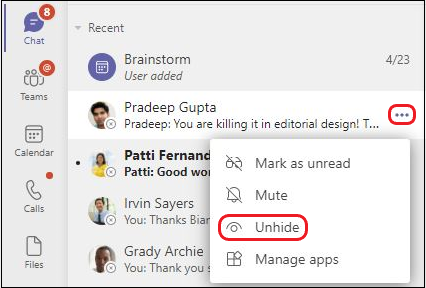
The conversation will now show in your chat list on the left, but if you don't see it right away you can select Filter
to search for it.Once you've located the conversation in the chat list, select More options
> Unhide.
Select Show hidden chat history to see the conversation.
Mute a chat
When you mute a chat, you'll still be included in the conversation, but you won't get notifications from it.
Select Chat
to open the chat list.Next to the conversation you want to mute, select More options
> Mute.
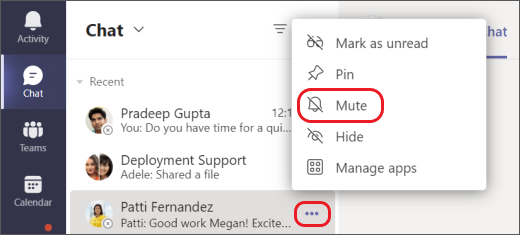
If you change your mind, just select it again and unmute it.
Note:
An icon appears next to the names of the participants to remind you that the chat has been muted.
Keep your chat list organized and focused by deleting entire chat threads in Teams. One-one-one chats, group chats, and meeting chats can all be deleted from your chat list. To delete individual messages from a chat thread, see Edit or delete a sent message in Teams.
From Chat on the left side of Teams, go to the chat you want to delete and select More options
 > Delete Chat.
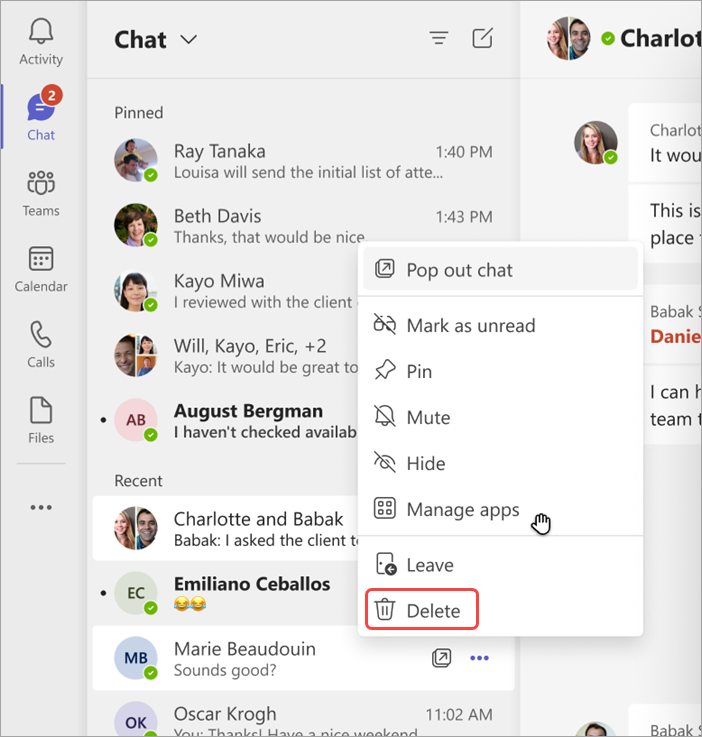
Select Delete.
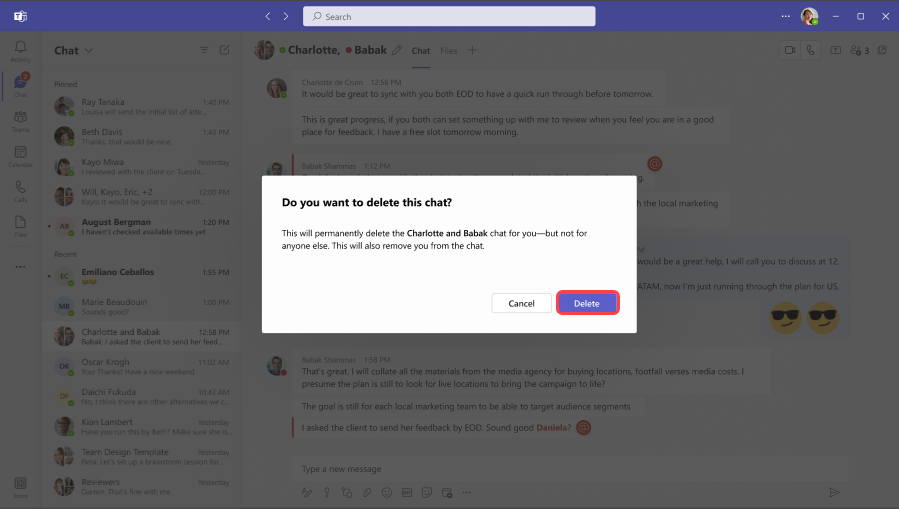
Once you've selected Delete, the chat will be permanently removed from your chat list and conversation history will be deleted. When this happens, you won't be able to search for messages that were part of the deleted chat thread.
Note:
If you are a meeting owner, you cannot delete the meeting chat. However, if you are a participant in the meeting chat, you can delete it.
Learn about Tab's in a channel or chat
Add an app to a tab
Go to the channel, group chat, or one-on-one conversation of your choosing and select Add a tab  .
.
Click the app you want.
A description screen for your chosen app will open. Hit Add.
Follow the prompts for your next step. Every app is a little bit different.
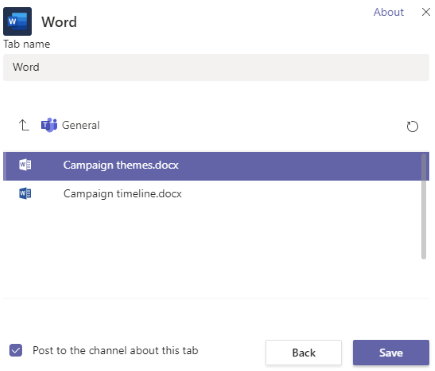
Add a specific file to a tab
You can turn a specific file into a tab—as long as you or a teammate have already uploaded or shared the file in a message in the chat or channel where you want to create the tab.
Select Add a tab and add the app for type of file you want to share. (eg. Word for a Microsoft Word file)
You'll be shown all available files of that file type. Select the one you want and hit Save.
Have a conversation about a tab
In the process of adding a tab, a box labelled Post to the channel about this tab is checked by default. (View screenshot in the section above.) You can uncheck it, of course. This starts a conversation about your new tab, and an an automatic post announcing it will appear in the channel.
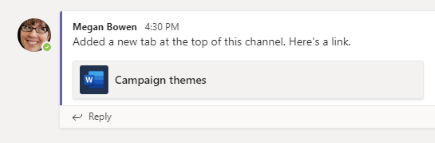
From within the tab, select Show tab conversation  to show or hide the discussion (or to start one for the first time). All replies made here also show up as new replies to the original post in the channel.

Editing files in a tab
Microsoft 365 file types can be edited in tabs by you or anyone in the same channel or chat. It's a fantastic way to collaborate!
For other file types, you'll need to edit your original files in their respective apps, then upload them if you want to share your changes.
Get a link to a tab
To get a link to a tab that you can share with teammates, go to the top-right corner of the tab and click More options > Copy link to tab.
Remove a tab
In one-on-one and group chats, anyone in the conversation can remove tabs.
In channels, anyone on the team can remove tabs as long as the team owner has set things up that way.
Go to the tab you want to remove, right click, and select Remove.
If you don't see Remove when you right click, it's likely for one of the following reasons:
Posts and Files are default tabs in channels and chats that cannot be removed.
Your org or team owner has restricted who can add or remove channel tabs.
The tab you're trying to remove is in a personal app, not a chat or channel. Tabs in personal apps are controlled by the maker of the app.
Use Teams meetings
Meetings in Teams include audio, video, and screen sharing. They're one of the key ways to collaborate in Teams. And you don’t need to be a member of an organisation (or even have a Teams account!) to join a Teams meeting—just look in the invitation for instructions about calling in.
Teams meetings are best when you join them from the Teams app or Teams on the web, and there's a bunch of ways to do that—read on for details about joining by link, from your calendar, and more. If you can't use the app or the web, some meetings let you call in using a phone number.
How to join a meeting
Join from Calendar or ID
- Select Calendar on the left side of Teams to view your meetings.
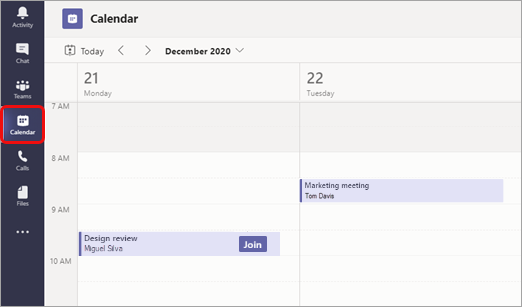
- Find the meeting you want and select Join.
Or, if someone starts the meeting, you'll get a notification you can use to join.
Join with a meeting ID from your Teams app
- From your Teams Calendar, select Join with an ID .

- Enter a meeting ID and passcode.
To find both the meeting ID and passcode, go to your calendar in Outlook. Open the meeting you want to join. At the bottom of the meeting invitation under Or join by entering a meeting ID , you'll find the ID and passcode.

- Select Join meeting to join the meeting as a participant.
Join in a channel
If a meeting takes place in a channel, you’ll see an invitation to join, relevant content, and who’s in the meeting right in the channel. Just select Join.
Join from chat
If the meeting has already begun, it appears in your recent chat list. Select the meeting in your chat list and then select Join at the top of the chat.

Call in
If you're unable to use the Teams app or Teams on the web, you can join some meetings by calling a phone number. Learn more here: Join a Teams meeting by phone
If there's a phone number and conference ID in the meeting invite, just dial the number to join.
Note:
Calling in to a Teams meeting does not require a pin.
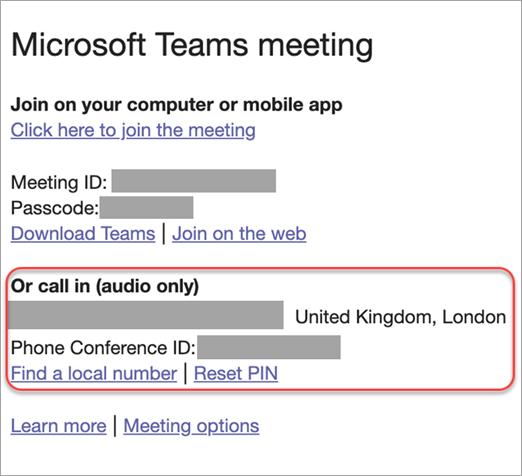
The number in your invitation may not be local to you. Select Find a local number to get one that is.
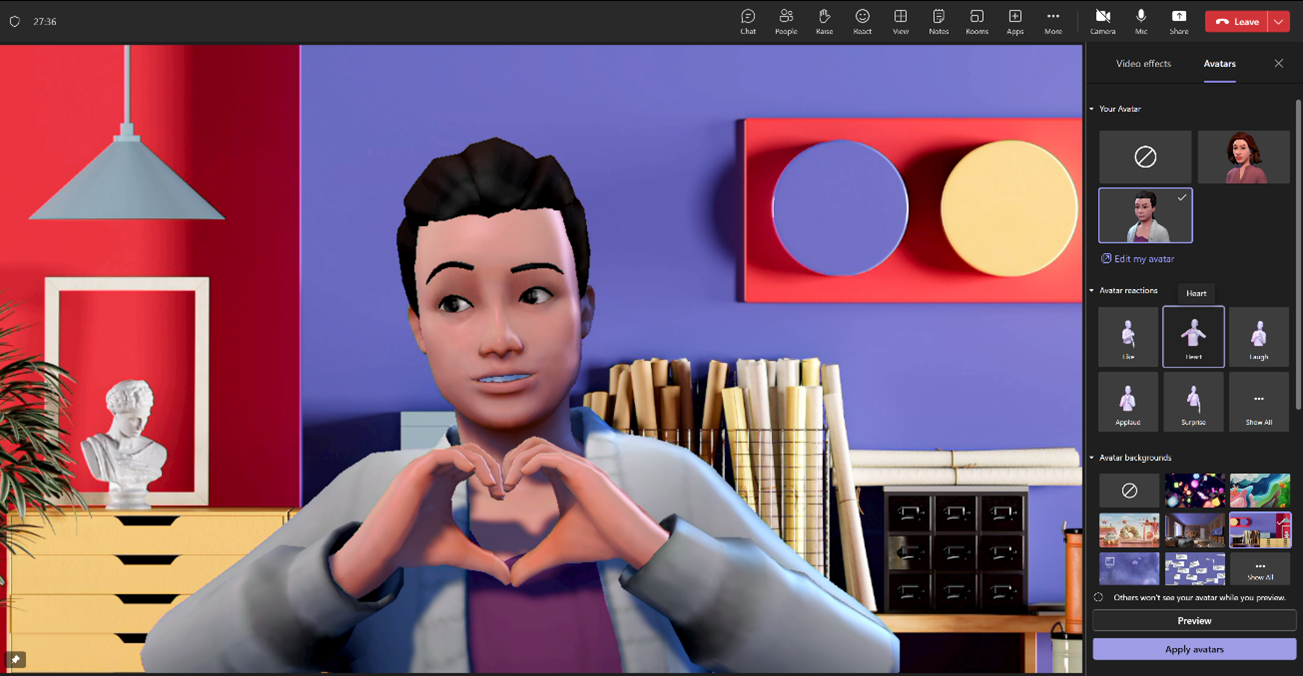
Join a meeting as an avatar
You can join any Teams meeting as a personalized avatar by following the instructions here .
Recommended articles
Join a meeting without a Teams account
Fix Bluetooth problems in Windows
Share content in Microsoft Teams meetings
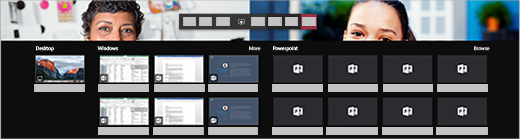
To share your screen in a meeting, select Share content  in your meeting controls. Then, choose to present your entire screen, a window, a PowerPoint file, or a whiteboard.
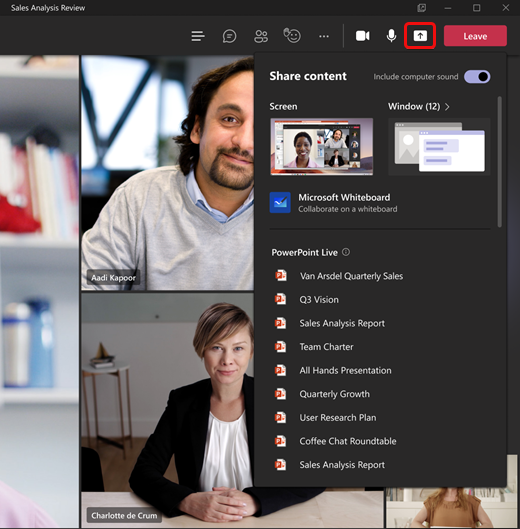
In Teams on the web, you'll see the following when you select Share content :
If you're using Teams on the web, you'll be able to share your screen only if you're using Google Chrome or the latest version of Microsoft Edge. Screen sharing isn't available for Linux users.
Here's an overview of the different Share options
Share 'Desktop'
- If you want to... Show your entire screen, including notifications and other desktop activity.
- Great when... You need to seamlessly share multiple windows.
Share 'Window'
- If you want to... Show just one window, and no notifications or other desktop activity.
- Great when... You only need to show one thing and want to keep the rest of your screen to yourself.
Share 'PowerPoint'
- If you want to... Present a PowerPoint file others can interact with.
- Great when... You need to share a presentation and want others to be able to move through it at their own pace.
- For info on PowerPoint sharing, see Share PowerPoint slides in a Teams meeting.
Share 'Whiteboard'
- If you want to... Collaborate with others in real time.
- Great when... You want to sketch with others and have your notes attached to the meeting.
When you're done sharing, go to your meeting controls and select Stop sharing.
Tip:
If you're experiencing choppiness or lag when you share high-motion videos, try the following keyboard shortcut after selecting Teams: Ctrl+Alt+Shift+T
^ Go to top
If you're using a Mac, you'll need to grant permission to Teams to record your computer's screen before you can share.
You'll be prompted to grant permission the first time you try to share your screen. Select Open System Preferences from the prompt.
If you miss the prompt, you can do this anytime by going to Apple Menu > System Preferences > Security & Privacy.
Under Screen Recording, make sure Microsoft Teams is selected.
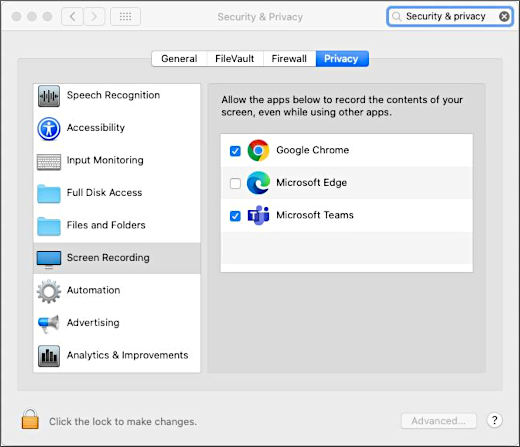
Go back to your meeting and try sharing your screen again.
^ Go to top
Sharing computer sound lets you stream audio from your computer to meeting participants through Teams. You can use it to play a video or audio clip as part of a presentation.
To share sound, select Share content in your meeting controls and then Include computer sound (it's the switch on the top right of your sharing options). All sound from your computer, including notifications, will be audible in the meeting.
For more info, check out Share sound from your computer in a Teams meeting or live event.
^ Go to top
Give and take control of shared content
Give control
If you want another meeting participant to change a file, help you present, or demonstrate something, you can give control to that person. You will both be in control of the sharing, and you can take back control anytime.
Note:
When you’re sharing an app, only give control to people you trust. People you give control to may send commands that could affect your system or other apps. We've taken steps to prevent this but haven't tested every possible system customization.
On the sharing toolbar, select Give control.
Select the name of the person you want to give control to.
Teams sends a notification to that person to let them know you’re sharing control. While you’re sharing control, they can make selections, edits, and other modifications to the shared screen.
To take control back, select Take back control.
Take control
To take control while another person is sharing, select Request control. The person sharing can then approve or deny your request.
While you have control, you can make selections, edits, and other modifications to the shared screen.
When you’re done, select Release control to stop sharing control.
^ Go to top
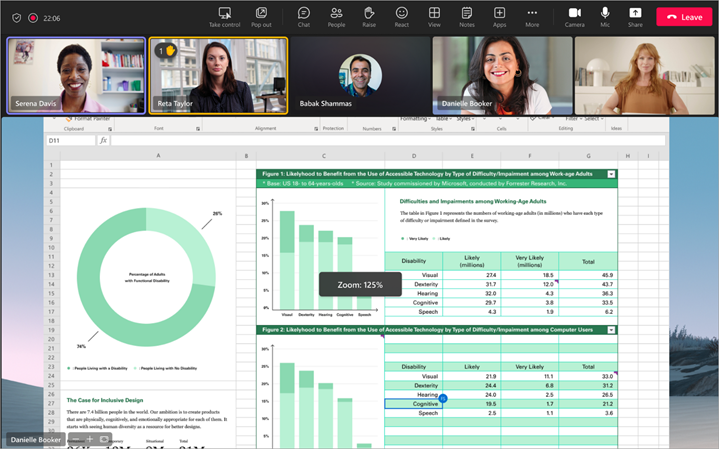
To get a better look at shared content, click and drag to see different areas. To zoom in or out while attending a meeting or call where someone is sharing their screen, use the buttons at the lower left of your meeting window: [+] to zoom in and [-] to zoom out.
You can also try the following:
Pinch in or out on your trackpad.
Use the keyboard shortcuts Ctrl+Plus sign and Ctrl+Minus sign.
Hold the Ctrl key and scroll with your mouse.
Note:
Mac trackpads don't support zoom in meetings. If you're on a Mac, use one of the other options. If you're using Linux, giving and taking control of shared content isn't available at this time.
^ Go to top
Pop out shared content in new window
Expand your view by popping out shared content in a separate window during your Teams meetings.
To pop out shared content:
Join your meeting from Teams for desktop.
When another presenter shares content in the meeting window, select Pop out from the meeting toolbar.
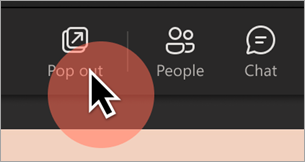
To pop content back into the meeting window, select X to close the pop out.
Your calendar in Teams is connected to your Exchange calendar. In other words, when you schedule a meeting in Outlook, it'll show up in Teams, and vice versa.
Every meeting scheduled in Teams is automatically made into an online meeting. Scheduling from Outlook? Learn how to add Teams to your Outlook meeting.
Schedule a meeting
There are several ways to schedule a meeting in Teams:
- Select Schedule a meeting
 in a chat (below the box where you type a new message) to book a meeting with the people in the chat.
 Go to Calendar
 on the left side of the app and select New meeting in the top right corner.
Select a range of time in the calendar. A scheduling form will pop open.
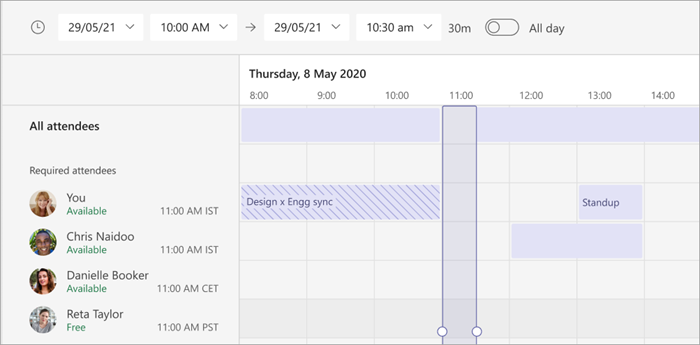
The scheduling form is where you'll give your meeting a title, invite people, and add meeting details. Use the Scheduling Assistant to find a time that works for everyone.
In Scheduling Assistant, you can see attendees' time zones, schedules, and availability during different timeslots. The Scheduling Assistant grid will show each attendee's schedule. Shaded areas show when attendees are busy or have tentative meetings. Unshaded areas show when attendees are free.
Once you're done filling out the details, select Save to close the scheduling form and invite attendees to the meeting.
Assign categories to a meeting
Colour code your calendar with categories. Just like in Outlook, you can assign one or more categories to each meeting in your calendar. There are a couple ways to assign categories:
Right-click an event in your calendar and select Categorize, then pick a colour.
- When scheduling a meeting, select Category at the top of the scheduling form.
Notes:
At this time, category names and colours can only be edited from Outlook.
For recurring meetings, categories can only be applied to the series, not an individual occurrence.
- Currently, categories can't be applied to channel meetings.
^ Go to top
Invite people outside your organisation
Teams lets you invite people outside your organisation, including those who don't have a Teams license. You'll need their full email address to invite them.
Go to where it says Add required attendees. If anyone is an optional attendee, select Optional instead.
Type the person's full email address (ex: Joe@example.com).
- Select Invite. They'll receive an email with a link to the meeting.
^ Go to top
Teams lets you invite people to a meeting via a meeting link. To share this link:
Create the meeting in Teams.
Go to Calendar
on the left side of Teams and select the scheduled meeting and click on the meeting.The meeting link will appear as a URL. Copy it by selecting
.
After you've invited people to your meeting, you can add up to 10 co-organizers to help manage your meeting. Before adding co-organizers, make sure the people you want to add are already added as required attendees and then follow the steps below:
Select your meeting and then select Edit.
Select More options
> Meeting options.
On the meeting options page, next to Choose co-organizers, select the down arrow and choose the name of the co-organizer.
Select Save at the bottom of your screen.
Note:
To learn more, see Add co-organizers to a meeting.
^ Go to top
Make it a channel meeting
To post your meeting into a Teams channel you can do the following:
Select New meeting.
Type the name of a channel where it says Add channel (under the time and date fields). This will take you to a list of your Teams. Located the Team and channel that you want to post your meeting invite.
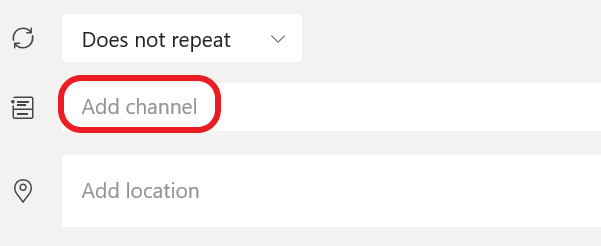
Channels can't be edited or added once the invite is sent. You'll need to send a new invite with the updated channel.
Note:
When you have a meeting in a channel, everyone in the team will be able to see it and join it in that channel. This feature isn't available in private channels.
If it's a recurring meeting, open the dropdown menu next to Does not repeat (just below the date). Choose how often you want it to occur from the default options, or select Custom to create your own cadence.
^ Go to top
How to add a shared calendar to a channel
Select Add a tab
 at the top of the channel
Search for and select Channel calendar from the list of apps available, or search for it from the search bar at the top right corner
Give the calendar a name and select Add
Now that you have a shared calendar, you can add meetings that all members can join. However, guests won't be able to view the calendar, so they'll need to be invited directly. Get the steps for how add events to your channel calendar at Schedule a meeting in Teams.
Note:
As of right now, channel calendars aren't available in private channels.
- Select Add new event at the top of the calendar.
Or, click and drag your cursor on the calendar to select a block of time.
Or, select the arrow next to Meet now at the top of the app to open the menu and select Schedule meeting.
Each of the above actions will open the scheduling form with the channel name filled in, feel free to add an Outlook group or individuals by manually entering their names. Guests and partners from outside your org won't have access to the channel calendar and will also require being added to the meeting invite.
^ Go to top
Right-click an event in your calendar to RSVP, remove it if it's cancelled, or open the invitation to view the meeting details. If the event is a Teams meeting, you'll also get options to Join online and Chat with participants.

Teams meetings will show a join button on an event in your calendar five minutes before the start of a meeting. Once someone joins the meeting, the event will change colours to let you know they're online.
Note:
If you have overlapping meetings in your calendar, the join button won't be available. But you can still right-click the event and select Join online.
^ Go to top
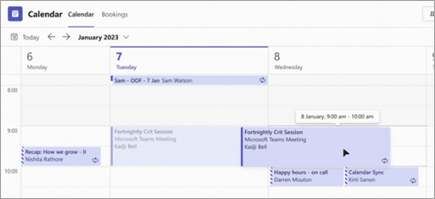
In your Teams calendar, you can reschedule meetings and events you organized. To quickly update a meeting time, select in in your Teams calendar, drag it into a new timeslot, and drop it.
You'll be notified of invitees' availability before you update the meeting time.
You can also change the meeting time by selecting the meeting in your Teams calendar, selecting Edit, choosing a new time, and selecting Send update. Attendees will automatically receive a notification with the updated time.
Set your Show As status in a Teams meeting
As an organiser, you can set the Show As status of the meeting in the action bar. When participants RSVP, their status will automatically reflect the status the organiser set.
As a participant, you can choose to set your individual status for the meeting through Show As independent of the status set by the organizer. The updated status will reflect on your calendar. The default Show As value for all the meetings an organizer schedules is Busy.
You can set your Show As status in several ways:
On the Scheduling Form Details page
On the Details view of the meeting (as a participant)

Start an instant meeting
There are a couple of different ways to get an impromptu meeting going with just a few clicks.
- Go to Calendar on the left side of Teams, then select Meet now
in the upper right corner.
- Next select Start meeting. This won't start the meeting, but instead take you into the lobby.
- In the lobby you will have a chance to set a few things up before you start your meeting. Give it a title, choose whether you want to use video, and pick your preferred audio source.
- When you're ready, hit Join now.
Your meeting is now up and running—you just need people to join you.
To invite people:
- Click on Add participants, or close this box, and then start typing the name or phone number of someone you want to invite in the box under People in the top right. Select them when they appear in the list, and they'll get a call right away.
- Another option is to copy the meeting link and send it to anyone you want to meet with, and they can join by selecting it. Just choose Copy join info and paste the link in a message.
If you don't have meeting scheduling capability in Outlook or Teams, starting an instant meeting is a great option. Just like with scheduled meetings, everyone who attends your meeting will continue to have access to the meeting chat, the recording, and anything else people share in the meeting (like files and meeting notes), even after the meeting ends.
To re-join the same meeting anytime, find the meeting chat in your chat list and select Join.
^ Go to top
To start an instant channel meeting:
Go to Teams
 on the left side of the app. Choose the channel you want to meet in from the list.
In the Posts tab, look for Meet in the top-right corner. From the drop-down, select Meet now. Or, to keep the context of a specific conversation, choose Reply below any post, and then Meet now
Give your meeting a title and choose whether you want to include video.
When you're ready, hit Join now.
Your meeting is now up and running, and anyone in the channel can join it.
To invite people:
- Click on Add participants, or close this box, and then start typing the name or phone number of someone you want to invite in the box under People in the top right. Select them when they appear in the list, and they'll get a call right away.
- Another option is to copy the meeting link and send it to anyone you want to meet with, and they can join by selecting it. Just choose Copy join info and paste the link in a message.
Record a meeting
Any Teams meeting or call can be recorded for future viewing. The recording captures audio, video, and screen sharing activity, and you can share it securely across the organisation.
A recording will expire and be automatically deleted after a set period of time. The length of time it's available is set by ISS, but you can change the expiration date of any given recording. For more info, see Manage the expiration of a meeting recording.
Start recording
When you start recording a meeting, you also turn on live transcriptions (ISS has enabled this as a default).
Start or join the meeting.
- Go to the meeting controls and select More actions > Start recording.
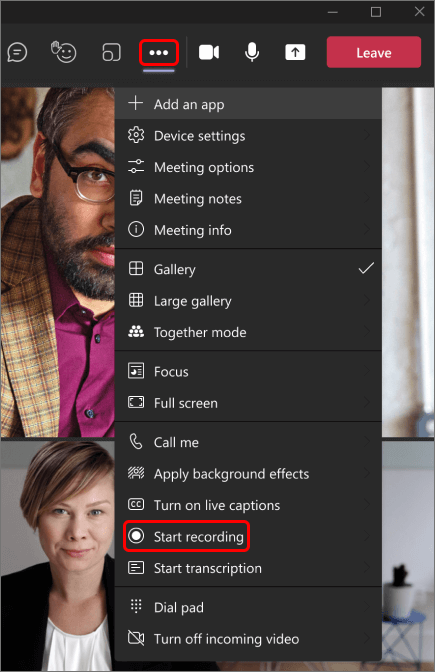
Everyone in the meeting gets notified that recording and transcription have started.

Notes:
You can't make multiple recordings of the same meeting at the same time. If one person starts recording a meeting, that recording will be stored on the cloud and available to all participants in the meetings' 'Chat' log following the end of recording.
- Meeting participants have the option of viewing the transcription during the meeting. For details, see view live transcription.
Stop recording
Go to the meeting controls and select More actions
.Choose one of the following:
Stop recording: Stops the recording and live transcription.
Stop transcription: Stops just the live transcription. The recording continues until you select Stop recording.
Recordings are available in different places depending on the type of meeting.
In the majority of cases, for scheduled meetings, you will find your recording either in the Meeting Chat or your OneDrive in the Recordings folder.
The recording is processed and saved to SharePoint if it was a channel meeting. This will show in the Channel conversation.
Note:
For now, guests and external attendees can view the recording only if it's explicitly shared with them.
Play and share a meeting recording in Teams
Play a meeting recording
The recording will be available after the meeting was scheduled to end (so not necessarily when it actually ends).
If you were part of a scheduled meeting, go the Details tab of the meeting event in your calendar and select the recording.
If it was a channel meeting, go to the channel conversation and select the recording.
You can also select More actions on the meeting recording and choose Open in OneDrive if it was a chat meeting, or Open in SharePoint if it was a channel meeting.
Meeting recording storage and permissions
Teams meeting recordings will be stored in OneDrive or SharePoint, depending on the type of meeting.
Note that a recording will expire and be automatically deleted after a set period of time. The amount of time it's available is set by ISS, but you can change or remove the expiration date of any given recording. For more info, see Manage the expiration of a meeting recording.
Channel meetings
For channel meetings, the recording will be stored in a Recordings folder in the Files tab for the channel.
The Files tab stores all files in a SharePoint site and document library for the channel. Everyone who is a part of the channel will have permission to edit and view the recording.
All other meetings
For non-channel meetings, the recording will be stored in the Recordings folder in the OneDrive directory of the person who started the recording.
Share a link to a meeting recording with others
If you recorded or organized the meeting, you can share the recording with people who weren't invited to the meeting—by just sharing it like you would share any other file. Just find the file in OneDrive or SharePoint and share it directly with people or copy a link and share it however you like.
Note:
Go here to learn more about sharing meeting recordings in OneDrive and SharePoint.
If you weren't the person who recorded or organized the meeting, you can still share the recording with people who weren't invited to the meeting. However, the meeting organizer or the the meeting recorder will need to approve your share action before other people will get access.
Note:
Go here to learn more about sharing a file in Microsoft 365.
Download a meeting recording
Only the person who started the recording and the meeting organizer can download the recording. Go here to learn more about downloading files or folders from OneDrive or SharePoint.
Use breakout rooms in Teams meetings
In all but the smallest meetings, it can be difficult to have open discussions and a meaningful exchange of ideas. With breakout rooms, people gather in small groups for lively conversation and brainstorming sessions.
Only meeting organizers on the desktop versions of Teams (Windows and Mac) can create and manage breakout rooms.
You can automatically assign people to breakout rooms when you create them. If you want to move people around later in the meeting, you'll have to do so manually.
To create breakout rooms, you must be a meeting organizer or presenter who's been appointed a breakout rooms manager.
Create breakout rooms before the meeting
Go to your Teams calendar and open the meeting invite.
- Go to Breakout rooms and select Create rooms.
- Choose the number of rooms you want (up to 50) and select Add rooms.
In this example, three rooms were created but no one's been assigned to them yet.
- Select Assign participants.
- Choose whether you want Teams to evenly assign people to rooms (Automatically) or assign people yourself (Manually).
As soon as the meeting starts, you can open the breakout rooms.
^ Go to top
Create breakout rooms during the meeting
Start the meeting.
In the meeting controls, select Breakout rooms
 .
.

Do the following:
Choose the number of rooms you want (up to 50).
- Choose whether you want Teams to evenly assign people to rooms (Automatically) or assign people yourself (Manually).

Note:
You won't be able to automatically assign people to breakout rooms later in the meeting.
Select Create rooms.
Change breakout room settings before meeting
Make your meetings more efficient by adjusting breakout room settings before they start. Meeting organizers can plan ahead by creating and naming breakout rooms, sorting attendees into rooms, setting timers, and more.
To change breakout room settings for meetings you organized:
Go to your Teams calendar and open the meeting invite.
Go to Breakout rooms and select Settings.
- Within the settings you will find the below options to adjust:
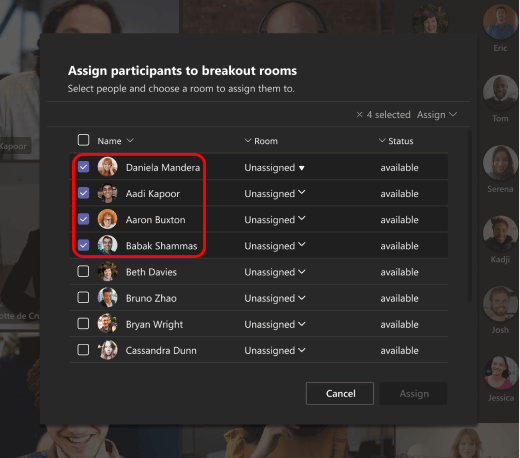
Assign people to breakout rooms manually
Assign people manually before the meeting
Go to your Teams calendar and open the meeting invite.
Go to Breakout rooms and select Assign participants.
Choose Manually and select Next.
Choose the people you want in a room by selecting the checkboxes next to their names.
Select the down arrow next to Assign and choose a room for them.
Repeat the previous steps until everyone in the meeting is assigned to a room. When you're done, select Confirm.
Assign people manually during the meeting
In the meeting controls, select Breakout rooms
.Select Assign participants. From this window, sort people to see who's been assigned where by selecting the down arrow next to Name or Room.
Choose the people you want in a room by selecting the checkboxes next to their names.
Select the down arrow next to Assign and choose a room for them.

Repeat the previous steps until everyone in the meeting is assigned to a room. When you're done, select Confirm.
If someone joins the meeting late, select Assign participants again to assign them to a room.
^ Go to top
Appoint breakout rooms managers
If you're the meeting organizer, you can delegate presenters to manage the meeting's breakout rooms.
Breakout rooms managers can:
Add and delete rooms
Assign and reassign participants to rooms
Open and close rooms
Join any rooms
Set time limits for room sessions
Send announcements
Recreate rooms
Important:
Only one person at a time can manage a meeting's breakout rooms.
Appoint managers before the meeting
Go to your Teams calendar and open the meeting invite.
Go to Breakout rooms and select Room settings
.Switch the Assign presenters to manage rooms toggle on.
- Select Search for presenters and choose who you want to be breakout rooms managers.
Appoint managers during the meeting
In the meeting controls, select Breakout rooms
.Select Room settings
.Switch the Assign presenters to manage rooms toggle on.
If no one in the meeting is designated as a presenter, select Go to Meeting options to add presenters, and choose who you want to be a room manager.
Choose presenters from the dropdown menu.
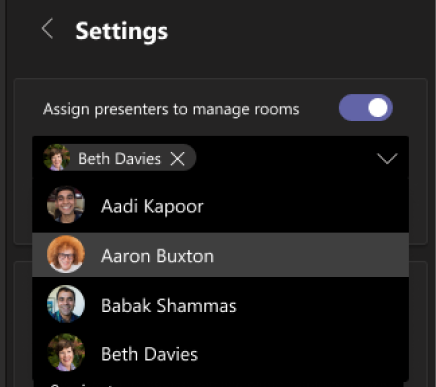
- Select the back button < to save your changes.
Take control of breakout rooms
You might be one of a few breakout rooms managers in your meeting. Only one of you can control the rooms at a time, though.
In the meeting controls, select Breakout rooms
.You can see who the current manager is (for example, Daniela is in control).
- Select Manage rooms.
Rename breakout rooms
If you want, rename each room to reflect its purpose (for example, what the people in that room will be working on).
In the meeting controls, select Breakout rooms
.
Hover over the room and select More options then Rename room.
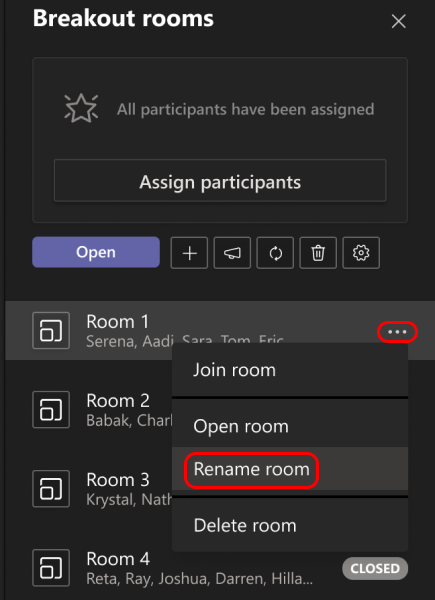
Enter the new name and select Rename room.
Tip:
During the meeting, you can delete all the breakout rooms and set them up differently (see Recreate breakout rooms from scratch).
^ Go to top
Set a time limit for breakout room sessions
When you set a time limit, a timer is visible in each breakout room so that participants are aware of when the session will end. When time is up, the rooms close and participants return to the main meeting.
Note:
If you turn off the Automatically move people to rooms setting (see Turn off automatic entry to breakout rooms), participants will have the option of either returning to the main meeting or leaving the meeting, when time is up.
In the meeting controls, select Breakout rooms
.Select Rooms settings
.Select Set a time limit, and choose a session length.
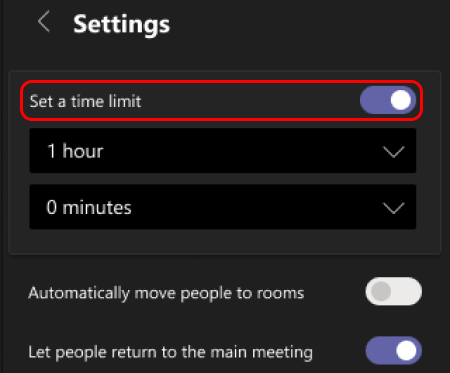
Select the back button < to save your changes.
^ Go to top
Start using the breakout rooms
By default, meeting participants are moved to their assigned rooms as soon as you open them, but you can turn off this setting (see Turn off automatic entry to breakout rooms).
In the meeting controls, select Breakout rooms
.Do one of the following:
To open all the rooms at the same time, select Open.
To open a single room, hover over the room, select More options, and choose Open room.
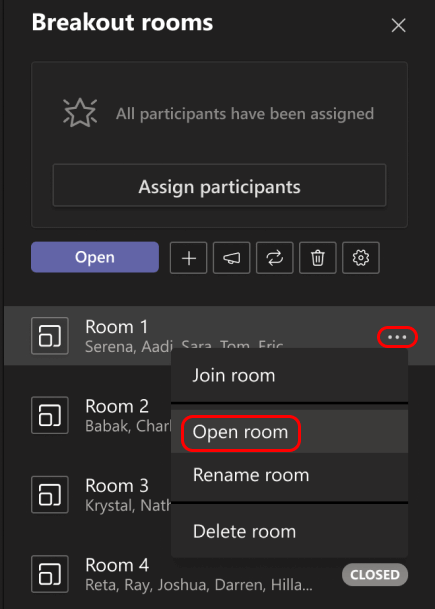
You can open and close breakout rooms more than once during a meeting.
Join a breakout room
If you're the meeting organizer or a breakout rooms manager, you can join any of the rooms.
In the meeting controls, select Breakout rooms
.- Hover over the room and select More options then Join room.
Leave a breakout room
In the meeting controls, select Return.
Interact with breakout room participants
As meeting organizer, you can send announcements to all the breakout rooms and contribute to any of the room chats.
Send an announcement to all breakout rooms
You may want to tell everyone the remaining breakout session time, offer discussion ideas, or just give general updates.
In the meeting controls, select Breakout rooms
.Select Make an announcement
 .
.Enter your announcement and select Send.
Participants are notified in their meeting chat to check for your announcement.
Chat in breakout rooms
Each breakout room has its own chat. All of the chats are available in your main Teams Chat list.
Here you can chat with the members of any breakout room.
After you join a breakout room, you can also select Chat in the room to chat with the people there.
Note:
When the breakout room closes, the room chat ends and can't be continued. However, you'll still be able to view the chat history and any shared files.
Close breakout rooms
When you close the breakout rooms, the participants return to the main meeting.
Note:
If you turned off the Automatically move people into opened rooms setting (see Turn off automatic entry to breakout rooms), participants will have the option of returning to the main meeting or leaving the meeting when the rooms are closed.
Close rooms individually
In the meeting controls, select Breakout rooms
.Hover over the room and select More options then Close room.
Close all the rooms at the same time
In the meeting controls, select Breakout rooms
.Select Close.
You'll know rooms have successfully closed when their status changes to Closed.
When everyone is back from their breakout rooms and you're ready to meet as a larger group again, select Resume.
Notes:
Breakout rooms remain open until the organizer manually closes them or unless they set a timer.
If the rooms are reopened later in the meeting, participants keep the same room assignments they had before.
Attendance reports for breakout rooms
If you organize a meeting, you can gain insight into its participants and their breakout room activity through attendance reports. Learn which breakout room each person joined, when they entered it, and when they left.
To view breakout room data from a meeting:
Open Teams and select Calendar.
Find the meeting you'd like insight into and select it to view the meeting details.
Select Attendance.
Under Participants, select an attendee to see which breakout room they entered and what time they joined and left it.
To reference breakout room data later, download the attendance report in CSV format.
Notes:
Only meeting organizers can view attendance reports.
Attendance reports don’t include data from deleted breakout rooms.
Additional options for breakout rooms
Turn off automatic entry to breakout rooms
By default, participants are automatically moved into breakout rooms when they're opened. When you turn off this option, participants receive a message asking them to join a breakout room. They select Join room (Join on a mobile device) before being moved.
In the meeting controls, select Breakout rooms
.Select Room settings
.Switch the Automatically move people to rooms toggle off.
Select the back button < to save your changes.
Meeting attendees can learn more about joining and participating in breakout rooms here: Join a breakout room in a Teams meeting.
Allow people to return to the main meeting
By default, this setting is off. Turning it on gives participants the option to leave their breakout rooms and return to the original meeting to rejoin the larger discussion.
In the meeting controls, select Breakout rooms
.Select Room settings
.Switch the Let people return to the main meeting toggle on.
- Select the back button < to save your changes.
Move a person to a different breakout room
Participants can be moved when breakout rooms are open or closed.
In the meeting controls, select Breakout rooms
.Select Assign participants and select the checkbox next to the person's name you want to move.
- Choose a new room for the person and select Assign then Move.
Add another breakout room
In the meeting controls, select Breakout rooms
.- Select Add room .
Delete an individual breakout room
In the meeting controls, select Breakout rooms
.- Hover over the room and select More options then Delete room.
Delete all breakout rooms at once
In the meeting controls, select Breakout rooms
.- Select Remove rooms
 then Remove.
Recreate breakout rooms from scratch
During a meeting, you can delete all the breakout rooms, create new ones, and reassign participants to them.
In the meeting controls, select Breakout rooms
.Select Remove rooms
and confirm the decision.Follow the instructions above to create new breakout rooms and assign people to them.
^ Go to top
Learn about Calls & Devices
Click here to See the knowledge article dedicated to Microsoft Teams calling capabilities
Calls are a quick way to connect in Teams. You can have one-on-one calls or calls with several people. You can set them up ahead of time like a meeting, or you can start them on the fly while in a chat (for example).
While meetings are a great way to collaborate in Teams, calls can be a more direct way of connecting for completing specific tasks or for getting questions answered quickly.
View or add contacts
To view your Teams contacts, select Calls  and choose Contacts on the left. Here you'll find an A-Z list of all your contacts and a search bar that you can use to find someone specific.
If you want to add a new contact to your list, click Add contact at the top of your list to get started.
You can also access your Speed dial contacts and any call groups you have created—all on the right side of Teams. Just select Calls and access them there at any time. 
Things you can do from here:
Speed dial allows you to quickly reference and call back any recent contacts or contacts that you have added to speed dial.
Call groups organize your teammates to help you find or reach certain people based on a role or team.
To add someone to speed dial or any call group, select More actions
 next to the group name and choose Add a contact to this group.
You can quickly call any contact back by selecting Call below their name.
Note:
If you don't see Calls on the left side of Teams, log a service ticket with ISS.
To create a new contact group, first go to Chat on the left side of Teams. Then select the Chat dropdown at the top and select Contacts.
Next, choose Create a new contact group at the bottom. Then follow the instructions to create a new group.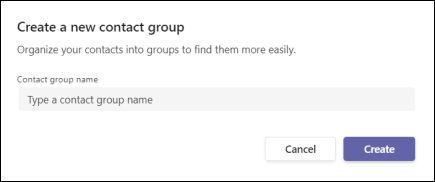
^ Go to top
My microphone isn't working in Teams
If others can't hear you in Teams calls and meetings, you might be having a problem with your microphone. Here are some solutions to get you back on track.
Check for updates
If others can't hear you in Teams calls and meetings, or audio from your microphone isn't being detected, first make sure you have the latest Teams app version installed.
To check for updates in Teams, go to your profile picture in the upper-right of the Teams app and select Check for updates. Updates typically install in the background if they're available.
Check if your microphone is in use
To make sure you can use your microphone in Teams:
Close all other apps that might be using your microphone.
If you’re using an external microphone, try unplugging it and plugging it back in.
- You can often save time and effort by restarting your device.
Make a test call
Making a test call can let you know if your microphone is working properly.
To make a test call, in Teams select your profile picture, then choose Settings > Devices. Then select Make a test call under Audio devices.
In a test call, you'll see how your mic, speaker, and camera are working. Follow the instructions from Test Call Bot and record a short message. The message will play back for you. After that, you'll get a summary of the test call, and you can go to your device settings to make changes.
Notes:
The test call feature is only available in English for now. Additional languages are coming soon.
We'll delete your test recording immediately after the call. It won't be retained or used by Microsoft.
The test call feature is currently unavailable for Teams on the web.
Learn how to use files in Teams
You can access your Teams' shared files by following the following steps.
First navigate to your Team by clicking on the Teams icon on the left-hand menu. You may have to click it twice to get to the right screen.
Find and select your service area Team.
In the General channel of your Team, click on the Files link in the top menu. This opens your team’s files directory.
You can now navigate through the files structure to find a file. You can also create a new file, upload a file, copy the link of an existing file to share its location with someone else or download a file. (For more information on Files in Microsoft Teams - click here )
To search for a file, you will get the best results if you open your files in SharePoint and perform the search there. To do this, follow steps 1-4 above, then open in SharePoint by clicking on the ellipsis (...) and selecting Open in SharePoint as shown below.
Next SharePoint will open in a browser showing you your team's file directory. Type your key word in the Search box as show below.
There's much you can do with your own files without leaving Teams, including moving, copying, and editing them. For other ways to open your files, including allowing you to have more than one document open, select More options .
If you are wanting to open multiple documents, once you have chosen how to open your first file, go back to the original files tab and follow the steps for each document.
Print Microsoft 365 files from Teams
There are a few ways to print a Word, Excel, PowerPoint, or OneNote document depending on how you open the file in Teams.
In Teams, find the file you want to print and select More options
To open the file, choose one of these options:
Edit in Teams: Opens the file within Teams.
Open in Desktop App: Opens the file in its related app (for example, Word).
Open in Browser: Opens in your default browser.
Print the file:
From Teams: Select File > Print and follow the onscreen instructions. If needed, open a PDF version of the file in your browser where you can print.
From the desktop app or browser: Select File > Print and follow the onscreen instructions.
Print other types of files
How you print other files depends on the browser or app you use to open the file from Teams.
Use Teams on the desktop or web to quickly move or copy files.
Go to the Files tab in a channel.
Or, if the file is in your OneDrive, go to Files on the left of Teams and select OneDrive.
Select More options
next to the file and then select Move or Copy.
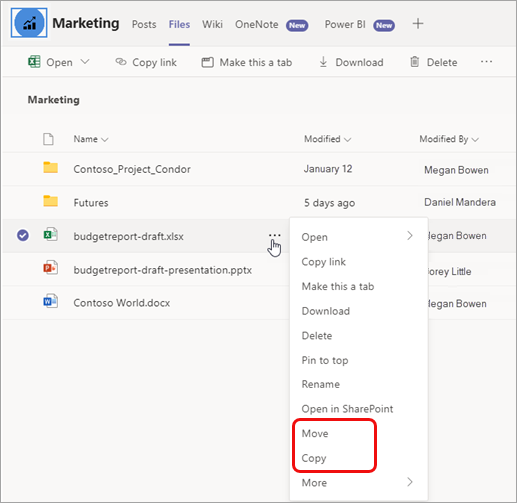
To move or copy several files at once, select each file by clicking the left side of its row, and then select More options next to one of the selected files.
In the dialog box that opens, navigate to the folder you want to move or copy the file(s) to and then select Move or Copy.
You can move and copy files:
Within the same team.
Between teams.
Within the same OneDrive.
Between OneDrive and a team.
Note:
You can only move folders in SharePoint or via OneDrive sync.
You don't need to copy a file to share it in multiple channels and chats. Instead, share a link to it. For instructions, see Get a link to a file in Teams.
How to link to an existing filed Teams document in conversations
Click on the paperclip icon at the bottom of the conversation page.
Select Browse Teams and Channels.
Select the file you wish to link from the selected Team or Channel.
Click Share a link.
Alternatively, when you have a document open (for example in your desktop Word app), look for and click the Share button at the top of the screen.
You can then choose how you want to share your file. Either type in an e-mail address/s, copy the link to embed in an e-mail or team conversation, or click on the Outlook icon to automatically open an e-mail with the link attached.
Search and filter people and files
If you're looking for a specific person or file in Microsoft Teams, use the Search bar at the top of the Teams page to find what you need. Click here to watch a video on how to do this.
Search for people
At the top of Teams, use the Search bar to find someone.
Type in a name.
If you'd like, choose a suggested name that appears, or press Enter to show more search results.
Choose a person, or to view more people results, select More people or select the People tab.
On the People tab, view additional contact cards for who you're searching for.
Choose one to go directly to a chat with that person.
Search for files
Use the Search bar to find a file.
Type in file keywords and press Enter.
Choose a file result, or to view more file results, select More files or select the Files tab.
Filter files based on:
Team - to show files from a team or channel.
File Type - to filter files by a certain file type.
Modified by - to show files edited by a specific person.
Date - to filter files by date.
To reset file filters, select Clear all.
Choose a file result to expand and learn more about it.
Select Open file to open and view it in a browser.
Fix error messages when trying to open a file
Occasionally when working with files an error message has been known to appear in the bottom right corner of the screen. The most common reason this appears is due to very long file or folder names.
Check the path of the file and if it seems to be several folders deep or the names of folders and files are quite long, consider renaming them to shorten the character length. Check to see if this resolves the issue. If not escalate to the Service Desk.
Explore the Files list in Teams
Teams often work with a lot of files. The Files list makes it easier to locate the one you need. Click here to watch a video giving a quick tour of the Files list.
To navigate the Files list, select Files  on the left side of Teams for quick access to all your files.
Here you will find the following arranged views:
Recent lists every file you’ve recently viewed or edited.
Tip:
Another way to view your recent files is to enter /files in the command bar at the top of Teams.
Microsoft Teams contains all the documents that were recently created or edited in the channels that appear in your teams list.
Downloads shows all the files you've downloaded from Teams. This list is cleared each time you sign out of Teams.
Cloud storage shows the cloud storage services you've connected to Teams. Select a service to view your cloud files.
From here, you can delete any personal file you've added to Teams, upload files, and create new files. Files added to cloud storage are private until you share them.
By default, OneDrive cloud storage is made available to you. You will also see an Add cloud storage button at the bottom of the screen. This allows you to add access to any other cloud platforms you may have. Only you have access to these platforms via Teams.
^ Go to top
Sync Teams files to OneDrive
Our recommended way of creating, accessing and editing files is through the Teams interface. This gives you the most seamless experience when working with files on a day-to-day basis.
There are, however, some instances where you will need to utilise the OneDrive sync facility.
OneDrive sync enables you to synchronise an entire channel or single folder from Teams to your machine. This will allow legacy applications to be able to be saved into the file system. This does use synchronisation technology which comes with its pros and cons. OneDrive sync is not perfect and should be used only when necessary to minimise the risk of issues. If unsure, please contact the service desk.
The first step to syncing is to ensure you have Microsoft One Drive running.
Click on Start (Windows Icon, bottom left of your screen)
Then type 'OneDrive' in the search bar.
When OneDrive is running it will show in your app/system tray
If the OneDrive cloud is grey, you will need to sign in by simply clicking the cloud and select sign in. Your email address will usually auto-populate and the password is not required as it uses the password you signed into your computer with. OneDrive will then give you a tour/tips and then ask you where you wish your default OneDrive location to be which can be left as is. Once completed you are all set to sync.
To sync a folder, you need to browse to the appropriate Team and channel.
Click on the files tab and then "Open in SharePoint" from the top navigation bar. (Note: If you don't see the 'Open in SharePoint' option - click on the ellipsis to show more options, as below)
Once in SharePoint you can click 'Sync' to begin syncing the channel files. (Ensure you are in the correct channel before syncing)
After clicking Sync you may be prompted to "Open in OneDrive", click allow (or similar). Then a window will appear to let you know it is getting ready to sync:
Once finished a message should pop up in the bottom right of your screen:
You can now access these files from Windows Explorer.
Expand ‘Otago Polytechnic’ and you will see all the folders you have synced.
You can refine the view of the folders you have synced by hiding the ones you do not wish to see via the settings within OneDrive. You can also sync lower levels of the file structure if you do not wish to sync the entire structure. There are pros and cons to both processes, if you are unsure of what will suit you best, just ask Service Desk.
Collaborate on files in Microsoft Teams
As your team works together you'll undoubtedly have files that you'll want to share and collaborate on. Teams makes it easy to share files and work on them together. If working in Word, Excel, or PowerPoint files your colleagues can even view, edit, and collaborate on them, right within Teams.
Note:
If the file isn't one of the types mentioned above, it must be viewed in either SharePoint or its corresponding app.
Co-edit a file
Files uploaded and shared to a team are accessible to every member of the Team. In Office for the web, Office for Android or iOS, or the latest applications from Microsoft 365, you and your team members can co-edit Word, PowerPoint, or Excel documents, or comment on Visio files. No need to check files out or worry about if one of your colleagues has the document open. Just open the file you need to edit and if other team members are editing it too your changes will be seamlessly merged as you work.
Follow these links to learn more about collaborating (co-authoring) on Microsoft files
Accessing Teams on a non OP device
MS Teams has an app for almost any platform such as Mac, Android and IOS. Simply browse to the Microsoft Teams site and click the download button. Don’t want to install the app, not a problem! MS Teams is fully functional in a couple of browsers and partially supported in others.
See below link for “Get clients for classic Microsoft Teams.”
https://docs.microsoft.com/en-us/MicrosoftTeams/get-clients
If you are using a Windows computer provided by an organisation that is not OP, you may find it challenging to get access to the OP Teams system. Mac’s are unlikely to be affected due to the difficulty/reliability issues of configuring single sign-on.
Single sign-on is the ability to pass login credentials to another application, such as a web browser. SSO provides an added layer of security as users are not required to enter their username and password, reducing the risk of a third party capturing those details.
Example of this issue:
Teams desktop app and Teams Web signs automatically in or prompts for other organisations credentials (username and password). When logging out and trying to sign in using OP credentials, the login attempt fails or signs in using other organisations details again.
Resolutions to this issue vary depending on what policies the organisation has deployed to its computers. You could try using the web browser to access OP Teams or the Desktop app if not already used/preconfigured to use other organisations details.
We have documented the most consistent solution below to save time.
PreRequisite:
You must first confirm that Google Chrome is installed on the device before proceeding. Chrome will either be present on the desktop or in the start menu. You can get Chrome by clicking the following link and clicking the download option. The Chrome installation does not require administrator privileges.
Open Google Chrome and then Open an Incognito window.
Once the window is open, you can navigate to https://teams.op.ac.nz. The following page that appears will ask you to sign in using your OP credentials.
Once the login process has completed successfully, the Microsoft Teams web app will load. You can now use Teams as you would in the desktop app or your regular browser.
Note: Occasionally Chrome has default settings that do not allow Teams to access your microphone or camera. If you suspect this may be happening, go to settings > Privacy and Security > Site settings, and under camera and Microphone, ensure that access is allowed to https://teams.microsoft.com
If you have any issues with this process, please contact the service desk for further information.
^ Go to top
Further information:
Contact: Information Systems and Support through case creation.
 OP SIGN IN
 GUEST
GUEST